Really cold things

MANY IMAGES TO COME

Mostly physics, with a foray into biology

Fun with very cold things – dry ice or liquid nitrogen. Here are ten things to try, from making a flower shatter to liquefying air in a balloon to finding out how much water vapor you lose in your breath. Some you can do with inexpensive dry ice, some need liquid nitrogen (cheap, but the container is not!), and for all of them, take precautions. Here’s the link for the full set of stories.

Fun with very cold things – dry ice or liquid nitrogen

Equipment and supplies: cheap, unless you opt for a Dewar flask to hold liquid nitrogen ($300), but it’s useful lifelong; thermal insulating gloves are a must ($20)

Precautions: Frostbite damage to yourself is possible; be careful! Concentrated carbon dioxide from sublimating dry ice is toxic. Wear goggles for many of these demos. Don’t let liquid nitrogen stand a long time exposed to air to collect liquid oxygen.

The teaser: Many things act very differently when very cold – a flower shatters, as does a marshmallow, or even some steel. A balloon shrinks to nothing in liquid nitrogen (LN2) but reappears on warming. Make a witches’ caldron, or fog rings. Trap the water vapor in your breath. Make instant ice cream.

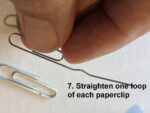
Picture Dewar; gloves; tongs

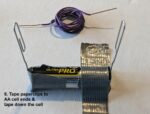
Images grabbed from 2018 demo at B&N?

Which items you can make depends in some cases on which ultracold source you choose. I describe these two chillers here and spell out precautions before getting to the fun:

* Dry ice is cheap (about $2/pound at a supermarket) and cold, at -78.5°C (-109°F). Many of the demos above can use dry ice, though not the disappearing balloon or simple instant ice cream. You can keep it in an insulated picnic cooler, and even transport it in a heavy paper bag. BE CAREFUL: besides its threat of freeze-burns, dry ice sublimates from solid to gas, without melting, generating abundant carbon dioxide gas, or CO2. CO2 concentrations above 10% are lethal with a number of breaths, so never keep dry ice in a small closed space where you might breathe in the CO2.

Dry ice will keep in a picnic cooler for a number of hours.

* Liquid nitrogen is cheap (about $2/liter at a welding supply store), but you must have a hyperinsulated Dewar flask, like a super Thermos bottle, to hold it; suppliers will only dispense it into a Dewar, as far as I am aware. It is hyper-cold, at -196°C, or only 77 kelvin above absolute zero; it’s at -320°F! It is the cldest thing you will experience in your entire life. In some ways, it’s safer than dry ice, in that you can’t get a solid piece stuck to your hand to continue freezing you. You may even see demos in which a person sticks his or her hand quickly into LN2 and then out again, with no ill effect; LN2 flashes into nitrogen gas that’s a fair thermal insulator. Don’t do it! Nitrogen gas is not toxic; it’s a simple asphyxiant, displacing oxygen, and you can readily recover with a new breath of ordinary air, provided that you haven’t passed out from a bad design of inhaling only high levels of N2 gas for awhile.

LN2 will keep for as much as 5 days in a good Dewar flask.

* Both dry ice and LN2 can “burn” your tissues from sufficient exposure – that is, for a sufficient time, though this is only several seconds, certainly for dry ice. USE HEAVY INSULATING GLOVES. Do not use gloves made of material that is porous. You can get good thermal gloves at a hardware store or a welding supply store.

* One final note, for an unlikely situation: nitrogen boils below the temperature at which oxygen condenses from air to form liquid oxygen or LOX. That’s a rocket propellant. If your demo device also has organic compounds in it where the LOX will accumulate, it makes an explosive situation. Avoid having organic compounds such as alcohol in the vessels you use for a demo. I was at Yale when a “trap” with only a fraction of a liter of LOX and organics exploded, breaking glass reagent bottles all over the lab.

The fun

Note: Wear goggles; some demos create flying small pieces

* Witches’ brew is classic, with dry ice. Fill a vessel with water. Break up a few chunks of dry ice and drop them in. A dense fog will form rapidly and hover above the water surface, while also spilling out onto the table or floor. It hovers and sinks because the fog is (1) cold and (2) containing a lot of CO2, which at any temperature is 50% denser than air. Low temperature alone makes a gas (vapor) denser, in inverse proportion to the absolute temperature. The vapor is only close to the freezing point of water, of course, not the temperature or dry ice, since it formed at the interface of the dry ice and water. You can make patterns in the fog, even mimicking those formed by airplanes traversing clouds or fog.

LN2 is much inferior in making witches’ brew. It’s less dense that water and floats on top, making an ice raft.

* Making soft items hard and fragile. A flower or a leaf is a structure made from water held under pressure in the plant cells. That pressurization is another interesting story (URL). Like a balloon, a water-filled cell is supple. You can mash it but not shatter it. That changes when you freeze it. A frozen flower or leaf shatters into fine piece when hit by, say, a hammer; then, all the pieces melt quickly to squishy things.

You can do the same demo with a marshmallow and then have tasty tidbits at the end.

You can do the same to a thin rubber ball, such as a handball; a thick or solid ball takes too long

Using LN2 to freeze an item: Have a handy container, such as a foam or paper cup (avoid metal cups that might tempt you to hold them; they’ll freeze to you, disastrously; avoid glass cups that might shatter from a rapid change in temperature). Pour some LN2 form the Dewar flask above halfway up the cup. WITH TONGS, hold the item and dip it into the LN2. It only takes a few seconds for a flower or a tin leaf. For a marshmallow or a handball keep it in the LN2 bath from15 to 30 seconds, waiting for the heavy boiling away of LN2 to slow (the boiling removes heat from the object). Remove the item and place it on a board or other solid surface (not glass, natch) and hit it sharply with a hammer. Voila!

Using dry ice to freeze an item: You need to make a medium that transfers heat well; you can’t readily hold a flower against a block of try ice and get it to freeze. The best and safest medium is pure alcohol, that is, ethanol. You might get some from a chemical supply store or, say, Carolina Biological Supply. Take care; there are legal constraints on having alcohol and there is a significant tax on the purchase. Ethanol freezes at -117°C (-180°F), so that it will stay liquid in contact with the dry ice and make a thick-ish slurry. Note that ethanol with some water will be a little messy, as the water will freeze out. Be careful handling large volumes of alcohol (pints, liters…); it is flammable; have a fire extinguisher handy and know how to use it. Break up the dry ice into dozens of small chunks and put them in a small insulated container. Pour on the alcohol and let it cool down until the frothing from CO2 subsides. Now use it as described for using LN2.

Acetone, or nail polish remover, also works as a heat transfer medium, as it stays liquid to -95°C (-139°F). However, do not use it unless you are a pro; it is very flammable, and more toxic than ethanol as a vapor.

An odd-on, that’s harder to do: making steel brittle: You can find hard steel and freeze it and then shatter it with a hammer. Surprisingly, case-hardened steels seem to be more vulnerable that cheaper steels. That’s why bike thieves can use liquid fluorocarbons as in Dust-Off to freeze and shatter a bike lock. Pick a thin piece of steel so you won’t end up hammering pointlessly. Hammer on a heavy wooden block so that you don’t damage the table or the floor.

* Quick ice cream: a nice quick freeze of milk or cream with sugar and flavoring makes fine crystals of ice, giving ice cream a fine, creamy texture. There’s no quicker way to freeze milk or cream than with LN2 (dry ice is not quite as good, we’ll see). In a wide container of an appropriate size, say, an empty icer cream container, make up a batch or milk, cream, or a mixture of the two; add sugar to taste (say, ¼ a much volume as the dairy product) and flavoring such as vanilla extract (chocolate is harder to deal with). WEARING your thermal gloves and goggles, pour in about a bit more than twice that volume of LN2 from the Dewar and stir quickly, vigorously, and continuously for about a minute, until the LN2 has evaporated. If you did it right, you’ll have nice and cold ice cream. Test the temperature before giving it to anyone to eat. If you used too much LN2 it may be so cold as to freeze-burn one’s tongue.

You’ll find it a bit tricky to measure LN2. It boils and churns as you pour it into anything at room temperature. Here’s a good way: get an insulated cup with a capacity of about 300 ml (more than 1 cup fluid measure). Let’s assume you’re making ½ cup of the milk mixture, or 120 ml. You’ll want about 264 ml of LN2, so, before you start, measure 264 ml of water into the cup and mark the level. Pour out the water and then use the emptied cup, filling it with LN2 to the mark. Pour that, slowly, into the milk mixture.

You can use a food mixer to keep the nascent ice cream churning as you add LN2. It also introduces some air bubbles that make an even nicer texture.

You can do the same process with dry ice. Break it up into fine chunks. You can figure out how much dry ice is needed per volume of cream and sugar mixture, using the heat of sublimation of dry ice… or you can just use 3/4 the volume of the cream and sugar mixture. That is, if you used 120 ml (1/2 cup) of milk/cream/sugar/flavor mixture, use 90 ml crushed dry ice. That is, fill the ½ cup measure ¾ full, or use a graduated cylinder, if you have one. The ice cream made this way will have a “bite,” an acidic taste from the CO2 that dissolved into the mixture to make some (harmless) carbonic acid. BE SURE that all the dry ice bits have sublimated away before serving the ice cream to anyone.BE SURE also that the ice cream is not too cold so as to cause frostbite to the lips or tongue.

* Blow up a balloon without breath: Both dry ice and LN2 undergo a change of phase from solid (dry ice) or liquid (LN2) to gas, with an enormous expansion in volume – over 1000-fold. You can put either one into a plastic bottle (not glass, certainly not for LN2) with a narrow mouth. Put a balloon over the mouth and watch it expand.

Make it much faster by adding water.

Make the volume change dramatic by using a tiny bottle to blow up a big balloon.

* Make smoke rings: Use a small squeezable bottle with a cap. Put a small hole in the cap with a needle or an awl (careful!). Fill the bottle with a bit of dry ice and water (or, less handily, with LN2 and water). Squeeze the bottle sharply to have it emit perfect smoke rings.

* Collapse a balloon to near-zero and let it expand again… and repeat it at will: Again using gloves and goggles and simple care, fill a foam or plastic cup with LN2 about halfway. Blow up a very long, narrow balloon, like the kind used to make balloon animals. It might start out 40 cm long (16”). Slowly immerse it into the LN2. It will shrink and shrink and shrink, to a flat piece! Be sure to use tongs to hold the tip at the end. Now remove the balloon and it will reinflate! Two effects are at work here. One is that gases contract in volume as the temperature is lowered. The great bulk of the effect is that the air in the balloon liquefies, to a mixture of LN2 and LOX, taking up less than a thousandth of the original volume.

* Really quick show: skittering droplets of LN2: Be sure no one has exposed skin near floor height; that means no open-toed shoes, for one. Take a modest quantity of LN2 in a cup and pour it onto the floor. Hundreds or thousands of tiny droplets will race across the floor, spreading out in an expanding set of tracks. Expect shrieks galore.

The spilled LN2 naturally breaks up into droplets, but these have no tendency to stick together. The LN2 in contact with the warm floor immediately flashes into gas. This has several effects. One is that it provides a bit of insulation so that the droplets stick around for many seconds. Another is that the little layer of gas beneath the droplet is a lubricant; the droplets float on it and maintain a notable speed. You can look up more under the term Leidnefrost effect. It’s the effect seen when you drop water onto a very hot pan that’s at a temperature way above the boiling point of water.

* This one is more of an experiment, beyond a simple demo: catch the water vapor in your breath: Get a length of food grade Tygon (plastic) tubing at a hardware store, about 2 m (6+ feet). Coil the central half of the tubing into a tight coil, about 10 cm (4”) in diameter and hold it coiled with long twist ties or string, your choice. Set up that bath with dry ice and alcohol, one that’s deep enough to submerge the coil. Have a person breathe in at a normal rate and volume but exhale through the tubing. Continue this for about 2 minutes. Remove the tubing from the bath and you’ll see water droplets in it. Uncoil the tubing and shake the droplets together. Estimate their volume, or cut the tubing and weigh the single drop with a common lad scale (about $16).

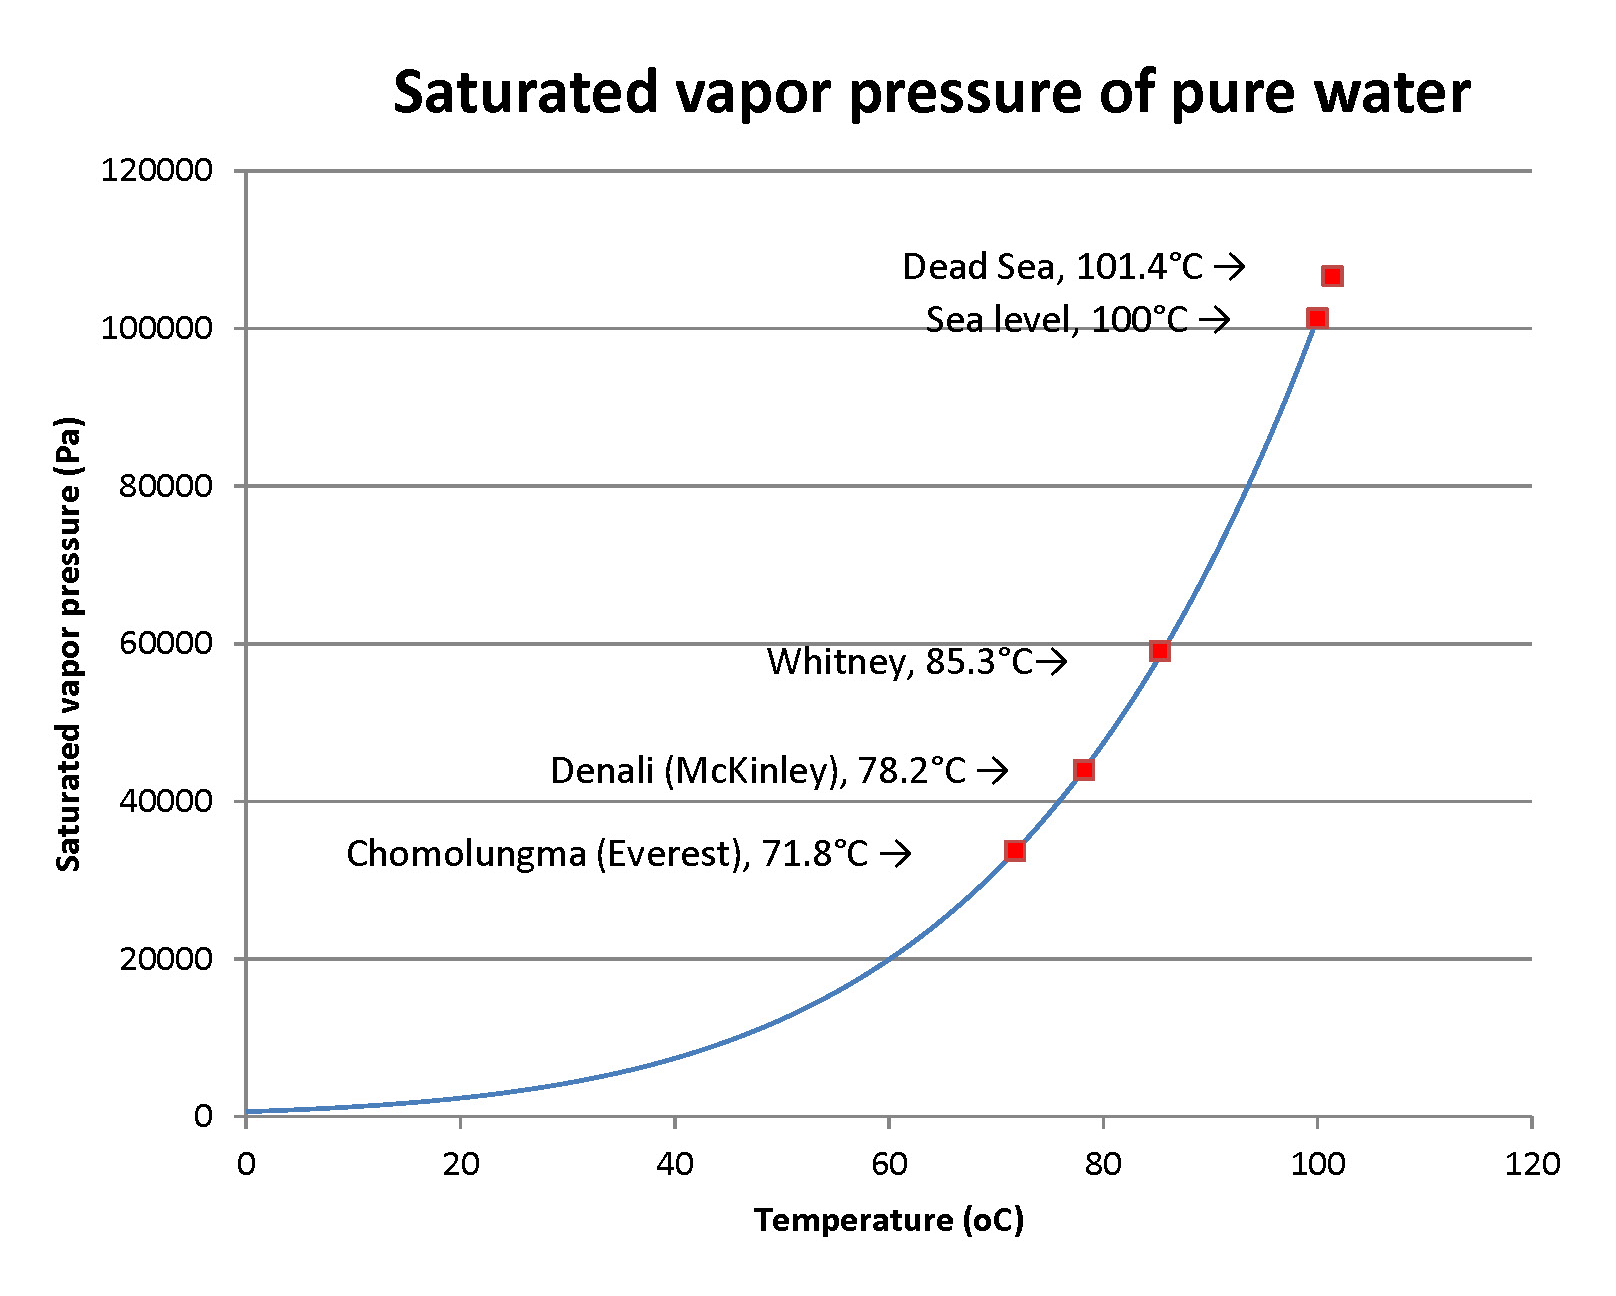
It may be surprising to the person that so much water was exhaled, as the gas water vapor. Here’s an estimate of how much to expect. In 2 minutes a person may take 12 breaths, each with a volume of about 0.5 liters. That’s 6 liters. Now, the amount of water vapor in the breath is the amount that is called saturating – the max that air can hold – at the temperature of the lungs. That temperature is close to core body temperature. That’s close to 37°C. There are nice mathematical formulas to compute this saturated water vapor pressure. In scientific units that’s 6300 pascals. It makes the air about 6% water vapor! Now we need some “gas laws” from physics. A short calculation yields the result that 6 liters of air at 37°C is a quantity of matter (air) that we can state as about ¼ of a mole of air (you’ll run into moles in chemistry). Six percent of ¼ of a mole is 0.015 mole. As a volume of water that’s ¼ of a cubic centimeter. It’s just measurable, so, does that make it not dramatic? The person who breathes a whole day breathes for 1440 minutes or about 720 times more than this sample. That makes the water loss in breathing about 720 * (0.25 cm3) or 180 ml. That’s easy to make up by drinking liquids. Well, at home, that is. If you’re climbing Chomolugma (Mt. Everest), really laboring and breathing many times the normal rate, you’ll lose much more… and you don’t want to carry that water. Better, use your stove to melt ice!


Fun and learning with a vacuum chamber

MANY IMAGES TO COME SOON

Many ways to have fun and learn with a vacuum chamber: Explore air pressure inside and outside of objects, dramatically; explore what “boiling point” really means; find out how sound transport and combustion are determined by air pressure; prepare for a dramatic experiment on air drag in a vacuum.

Fun with a vacuum chamber – a series of demos suitable for 15-30 minutes:

Equipment: substantial investment ($440, but utility is lifelong and good for public demos)

Explore air pressure inside and outside of objects, dramatically; explore what “boiling point” really means; find out how sound transport and combustion are determined by air pressure; prepare for a dramatic experiment on air drag in a vacuum

The whole shebang – what you need:

— the chamber for your experiments: a bell jar BJ with its gasket base BJB and a plastic nipple N for attaching the vacuum tubing to the base. The nipples cost only pennies; they come with the bell jar, but keep spares). The handle H and an arm around the bell jar is the safe way to pick up the bell jar. I paid $250 for the set, which is a big set for big demos and experiments. There are cheaper sets with small bell jars. The kit comes with vacuum grease to make a good seal between bell jar and base;

— heavy rubber vacuum tubing VT (about 2 m or 6’; maybe $5);

— the trap to prevent liquids and powders from getting into your vacuum pump and jamming it: a vacuum flask VF from a chemical supply shop ($10?); a rubber stopper RS to fit the flask (cheap; $0.50 as part of a kit); a short length of glass tubing GT to put through the stopper (pennies); a tool to pierce the stopper, esp. a cork borer of the diameter of the tubing ($2?); a simple triangular file to notch the glass tubing for breaking it by hand; gloves ($12) for this operation!; for safety, a butane torch to polish the glass tubing so that it’s not so sharp (buy this for other experiments, or find it in your home shop)

— the vacuum pump, its valve, and gauge: a vacuum pump VP ($105) with its handle H; note its built-in air vent AV that you need to open before a run and then close to keep dust out; the pump comes with special oil; a vacuum gauge VG or a combined vacuum/pressure gauge VPG to measure your vacuum extent ($20? I had such items from a long career and didn’t buy it anew for vacuum demos and experiments); 2 brass or steel threaded “tees” TT to attach the vacuum gauge and the bleed valve to the line ($6?); a needle valve NV to shut tight to pull a vacuum or to open to bleed air back into the chamber ($20?); short lengths of threaded nipples X (tubing with screw threads on both ends) ($8?).

Some safety considerations: A bell jar (your vacuum chamber) is a huge piece of glass; if you drop it and it shatters you have dangerous glass pieces running around. Note: it will not break under a vacuum; don’t worry about that. Another consideration: never put anything flammable inside a vacuum chamber – its vapors can explode upon reaching the vacuum pump with its electrical contacts in the motor. Just to protect your investment, don’t let liquids or powders get sucked out of the bell jar and into the vacuum pump; they can jam the mechanism for instant damage. To protect against this problem, use the indicated trap between the bell jar and the vacuum pump. Here’s the entire setup:

FIGURES or photos


Actual photo

Bell jar

Base, peeling up a ring; add arrow for “vacuum grease here”

Vent partial blocker

Bell jar on base with a balloon inside

Picture of vacuum gauge at zero

Balloon expanding, 2 stages

Vacuum gauge at peak

Magdeburg sphere split

Magdeburg sphere assembled

Sucking air out (or pull a frame from video

Pull a frame from students pulling on the sphere

Explore air pressure on the inside: super-expand a balloon: Blow up a nice round-ish balloon (not a long skinny one), one that blows up to about 1/3 the height of the bell jar. By pulling a vacuum on it, you can make it expand to fill the entire bell jar, covering all the walls… and popping eventually. You’ll need to prevent it from blocking the exit hole of the bell jar, which would stop the expansion. The easiest way to do this is to tape down a very short pencil or other round object so that it nearly covers the hole. It’s dramatic. The process here is just creating a difference in air pressure between the inside of the balloon and the outside. Balloons are normally inflated to an air pressure that’s a modest increase over the normal… and amazingly high… pressure in ambient air. At sea level it’s just over 100,000 pascals in metric (SI) units…which is a force of 10 metric tonnes on a square meter of area! There is a huge mass of air above your head. There’s a huge pressure of air inside your body, likewise. Scuba diving instruction makes you really aware of this. You can explode your lungs by letting up on outside pressure, as by ascending from even a modest depth while holding your breath. The first rule in scuba diving is not “have a buddy,” which is important, but instead it is “never hold your breath!” Changes of air pressure as a small fraction are induced by moving up in altitude; your ears likely “pop” ever few hundred feet (hundred meters) if you climb or go up in an unpressurized plane. Back to the balloon: it is ordinarily inflated to a pressure that might be 10% over ambient air pressure. The difference between 1.1 atmospheres of pressure inside and 1.0 atmospheres outside inflates the balloon. Putting the balloon in the vacuum makes a pressure difference 11 times greater, between 1.1 atmospheres inside and 0 atmospheres outside. That would be at the start. As the balloon expands in the vacuum, its internal pressure drops; there are interesting forays into the gas laws of physics to explore if you want to dig in.

More of exploring air pressure inside: expand a marshmallow: Marshmallows are full of closed air spaces; that is, air inside them can’t simply leak out. Put a marshmallow in the bell jar and pull a vacuum. It will expand like you’ve not seen it. Release the vacuum and retrieve the marshmallow. I fibbed a bit – some of the air spaces did break, so the marshmallow is a little smaller and a little less tantalizing to the tongue, but still tasty.

Explore what “boiling point” means: Let’s boil water, but at a temperature way below what we usually think of as its boiling point. Get a small insulated non-metal cup (non-metal, because you’re going to put it into a microwave oven. Put some pebbles or broken ceramic or commercial “boiling chips” into the cup, to help start bubbles forming during the demo. Add to the cup a small amount of water, say, ½ cup (around 120 ml in metric units) and warm it to about 50°C (122°F) in a microwave oven (careful! You can apply too much energy and superheat the water, such that it explodes into steam when you reach for the cup, spraying boiling water your way!). Use a short heating time. For a common 1000 watt oven, you’ll get a rise from room temperature of around 20°C to the desired 50°C in the ½ cup of water in about 15 seconds. To be safe, use 8 seconds and test the water temperature with your finger. That should bring the temperature up about 15°C, to near body temperature. If it feels right, add another 7 or 8 seconds. Put the cup into the bell jar and pump out the air. The water will start boiling when you get most of the air out!

Here’s the reason: all liquids evaporate to make vapor. That vapor has a pressure that’s a strongly increasing function of temperature. Here’s a graph of it:

When that pressure meets or exceeds the surrounding air pressure, the vapors come out as bubbles. The liquid is boiling. From the graph, you can read that boiling occurs at a pressure of 12400 pascals at 50°C , and that’s a pressure that’s only about 12% of normal air pressure. You’ve then pulled a vacuum that’s 88% of full air pressure. You’ll need to pull more of a vacuum as the water cools.

This is a demo, but you can make it into a full-fledged experiment by using different water temperatures and seeing what vacuum degree makes water boil. You could, in principle, do this with other liquids, but I can’t think of a safe liquid to use – nothing flammable is safe; common nonflammable liquids have really high boiling points.

Explorers and mountain climbers in the not-too-distant past used the relationship of boiling temperature to air pressure to determine how high they were above sea level. They knew the pattern of air pressure versus elevation as a simple mathematical function (math guys: the fraction of sea-level pressure at elevation h is exp(-h/8400m)). Boil a cup of water, take its temperature, use the formula for pressure versus elevation, and, voila, you know how high you are!

Chomolungma is the highest peak on Earth, at 8,846 meters (29,032 feet); water boils way below the “usual” temperature. Denali in Alaska is at 6,190 m or 20,310’; Whitney in California is at 4,494m or 14,505’; the Dead Sea is at -430m (minus 430 m, below sea level) or -1,411 feet… it can’t flow to the sea. Air pressure varies significantly with season, and especially on high mountains: cold seasons “condense” the air to lower elevations, leaving less air above and lower pressure on mountaintops. Air pressure on Chomolungma varies from 30,900 to 34,300 pascals, more variation than anywhere else on Earth.

Explore how really big air pressure is: evacuate a Magdeburg sphere:

Note: You can do this without a vacuum pump; with a pump you can make the effect stronger.

This goes back to a dramatic demonstration 368 years ago in the town of Magdeburg, Germany. The town mayor, Otto von Guericke, had invented an effective air pump. He used it to pump the air out of a sphere made of two halves joined with an air-tight gasket. He then showed that the pressure of normal air outside was so great that two teams of 15 horses each pulling on the two halves could not separate the sphere! The sphere was ½ meter in diameter, so the area of each half-sphere was about 0.2 square meters. If all the air had been pumped out, the force on each half would be 20,000 newtons, that of a 2,000 kilogram mass in Earth’s gravity. Multiply by two for the two halves. You get the same force as exerted by a 4,000 kilogram mass, about 8,800 pounds!

You can do this on a small scale with a “toy” Magdeburg sphere. You can buy one in cast iron for about $25. Here’s a picture:

PICTURES from above

Clean the rims of both halves well and then apply some thick grease, ideally vacuum grease such as you get with the vacuum pump. Join the halves and now suck out the air. First trial: do this by mouth (take care re hygiene; only one person does this, or you wipe down the tube with alcohol each time). Open the valve, put the exit tube in your mouth, and suck the air out. Using “cheek power” you can readily pull a vacuum that’s about 1/3 of normal air pressure. Close the valve. On a sphere of 8 cm internal diameter, you have an area of both halves that’s about 100 square cm or 0.01 square meter. The force on the halves at 1/3 of air pressure difference between outside and inside is then about 0.33*100,000*0.01 newtons or 330 newtons. That’s the force exerted by a 33 kg weight, or about 70 pounds. Get two people to try to pull the sphere apart; there are handles. Some strong, older students might be able to exert enough force to do this. They’ll fall in opposite directions suddenly; do this on a safe, soft surface such as a lawn, or pea gravel as we have at our school. Now boost the demo: connect the exit tube to the vacuum tubing on the vacuum pump and pump the air out. Now the effective force is 3x greater, that of a 100 kg weight. No two people can pull the sphere apart while standing, or maybe even foot-to-foot lying down!

Explore sound propagation at low air pressures: Get a mechanical noise-maker that will run for a minute or two on its own – a buzzer. Most electronic buzzers should work, also; they’re resistant to pieces bursting at low pressure. Put the buzzer in the vacuum chamber and pump it down. The sound will die down progressively. The reduction in sound transmission is a bit complicated to predict and it takes special equipment to measure the sound intensity outside, but the effect is clear. Sound is a vibration moving through the air… though it also moves through water and stiff solid nicely, and poorly through squishy items that “damp” it.

Explore chemical combustion in low air pressure: slowly extinguish a candle: A handy sample of combustion is a burning candle. Light the candle and put it inside the bell jar. Pump down the bell jar in stages, noting the flame height and light intensity at different air pressures. The fire needs oxygen as a complement to the wax that’s burning. The oxygen content of normal air is 21% of the total amount, whether measured as pressure, moles, or whatever. The key item for the candle is the partial pressure of oxygen, which is the total air pressure in the bell jar multiplied by 0.21 (21%). Lower oxygen pressure reduces the rate of combustion, and eventually combustion stops. This is a phenomenon well known to fire-prevention specialists.

To calculate the fraction of oxygen pressure relative to normal air, divide the pressure in the bell jar by normal air pressure. Now, you may have a gauge on your vacuum pump that reads only vacuum, which is the reduction of air pressure. Your gauge might read in any of several units. If you live in the US, the only nation not on the metric system, the gauge will likely read in pounds per square inch, or psi. Normal air pressure is 14.7 psi at sea level. So, if your gauge reads a vacuum of 5 psi, you’ve reduced air pressure to a fraction (14.7 – 5)/14.7 of normal, about 2/3. If your gauge reds directly in air pressure as a positive number it will be showing 14.7 – 5 = 9.7 psi. Look at the flame height vs. pressure in the bell jar. Find out at which air pressure the flame goes out.

Lead-in to a real experiment: figure out how you can show that a feather or a light tissue falls as fast a a dense solid object in a vacuum. The absence of air drag makes only gravity important. We did this in our school, and I’ll write this up under STEM experiments. It took some finagling to find how to hold a tissue and a button at the top of the vacuum chamber with a magnet and a small magnetic latch inside the bell jar. See if you can design a setup.


radioactivity in my heart

I took radioactive technetium willingly? Yes, it’s a good diagnostic for blood flow around the heart, and not as risky as you might expect. It also makes for a dramatic display near a Geiger counter! Here’s the link for the story.

Radiation straight from the heart.  In 2017 I had a diagnostic procedure done, in which I exercised and then got injected with the radioactive element (radionuclide) technetium-99 metastable. The gamma rays came flying out of my body to create an image on a screen.  I was still radioactively “hot” hours later, as a Geiger counter showed.

VIDEO TO COME SOON

The Tc-99 was chemically bound to a ligand that migrates preferentially to the heart.

Science Direct

The idea was to map the blood vessels around my heart – all normal, as it turned out. I was exposed to many gamma rays but for a fairly short time; the Tc-99 has a half-life of 6 hours.  My total exposure was [let me find my notes again], a fraction of my normal dose from cosmic rays, internal potassium load, and other sources.  It was enough to increase my lifetime chance of cancer by 1%. Anyway, about 6 hours after the test I wanted to show how radioactive I was.  I put a Geiger counter I had built from a kit on a table and walked up to it, while taking a video.  I pegged the Geiger counter output when my chest reached it. Fortunately, not only does Tc-99 decay fast, but the gamma rays don’t deposit much radiation in my body on the way out; if they did do so, they’d make a too-fuzzy image.  Note that Tc-99 is made “on-site” in the doctor’s office.  He or she gets a device loaded with molybdenum-99 that’s decaying to the metastable state of Tc-99.  When a diagnostic dose is needed the Tc-99 is quickly separated out chemically and bound to a special chemical, the ligand.

Diagram of gammas escaping to be imaged


Seeing in the thermal infrared

Let’s “see” thermal radiation, and see who’s (what’s) how or cold, and why. You’ll need a thermal imager that you can attach to your smartphone. It’s a bit expensive but it offers a lot of learning and even utility around the house to find heat or water “leaks.” Shiny metals and the clear sky both offer some real surprises.

The clear sky is so cold! Read temperatures at a distance, and with surprises.

Equipment: simple, except for one expensive infrared imager (ca. $400)

You can look at the temperature of things – your arm, a chair, a puddle of water, a piece of hot sunlit metal, even the sky. Here are two images we’ll look over in a bit:

Grab from science 2021-22

You can look into reasons why different objects attain different temperatures, and even why some objects seem not to register their “correct” temperature. We can take a picture of an object or even a whole scene and see the different temperatures of all the parts.

This is a demo that’s best done with a thermal imaging camera, not a common device, but you may find a scientist willing to do the demo. I have a FLIR ONE PRO, which is a small device that attaches to a smartphone, in this case, my Android phone. The FLIR has two imagers, one a standard light-sensitive camera and the other an array of 19,200 tiny bolometers that are sensitive to thermal radiation focused onto the array through a separate lens made of light-opaque germanium. The two imagers look at the same scene and are close enough to see overlapping images, one in the visible spectrum and one in the thermal infrared. The thermal infrared or TIR is a range of electromagnetic waves that are less energetic and of longer wavelength than ordinary light. Ordinary visible light is composed of waves with wavelengths of between 400 and 700 nm (nanometers, billionths of a meter), or about 1/100 the diameter of human hairs. Thermal infrared has much longer wavelengths; the FLIR captures waves between 8 and 15 μm (micrometers, millionths of a meter). That’s about 20 times longer than visible light, and carrying about 1/20th as much energy as sunlight’s particles of light or photons. That’s appropriate, since the energy of thermal motion at Earth’s conditions (a temperature of about 20°C or 68°F) is about 1/20th of that on the Sun, which is about 20 times hotter in absolute temperature (see below).

The core idea is that every object, even gases in the air, give off TIR at a rate that is proportional to the fourth power of their temperature on the absolute scale. The absolute scale is measured from absolute zero, where thermal motion stops (and only quantum mechanical zero-point motion remains – and interesting topic). Scientists use the Kelvin scale, which starts at -273.15 degrees Celsius; the freezing point of water on that scale is then +273.15 K (Kelvin, not degrees Kelvin). An increment of 1 K is the same as 1 degree Celsius (1°C). In the US (almost only the US!) people tend to use the ancient Fahrenheit scale, which we’ll peek at now and then. OK, let’s compare two bodies on Earth: a tree near you at 20°C or 68°F, and your face at a comfy 33°C (91.4°F). The absolute temperatures are 293.15 K and 306.15 K. The ratio of their fourth powers is (306.15/293.15) to the fourth power, which is 1.19 – that is, an area of your face gives off 19% more TIR than the same area of leaves. The FLIR detects these differences as signals that get converted to digital signals; the FLIR software processes these signals to temperatures that get presented as different colors. You can choose the color scale, with a common one being red for hot, through orange, yellow, green, to blue (as continuous hues or colors). That’s a nice picture each time. You can set the FLIR to present numerical values of the temperature at selected sites in the image.

There are some very amusing scenes to image, such as a person with hot, dark clothing and maybe a cool forehead just wiped with a wet towel and eyeglasses that stand out frames vs . lenses. I presented two scenes earlier that are also very informative. One is an image the includes a person, some shrubs, some soil, and a bit of sky. The person is warm, the sunlit soil is hot – it absorbs sunlight well and can’t shed heat very well to the air. The shrub stays cool as air flows well over its small leaves, taking away much heat deposited by sunlight. The sky looks cold, and it is. Let me explain. The air is at a mild temperature, about that of the shrubs, but air can’t radiate TIR well. The major gases, nitrogen and oxygen, are extremely poor radiators, for reasons that lie in the wonders of quantum mechanics. The only good radiator in the air is water vapor, and there isn’t much of it in the dry time that this picture was taken in Las Cruces, New Mexico (we are in the USA, though many people don’t know it). So, little TIR energy arrives at the FLIR thermal imager and it registers a low temperature. We often see sky “radiative temperatures” that are 40°C (72°F) below air temperature! There are interesting consequences. On a clear night we cool to the sky but get very little TIR back from the sky. Our bare heads feel colder than they “should.” This imbalance in radiation affects plants, too. On a night with air temperature just above freezing the plant’s leaves cool by radiation enough to get below freezing. That’s called a radiation frost. Farmers are well aware of it.

The second scene shows interesting properties of shiny metals such as the aluminum here. Those metals don’t absorb too much sunlight because they are so reflective in visible light. However, they do get very hot because they can’t unload that little heat energy very well; they have a low “thermal emissivity” or ability to emit TIR. Anyone who left a shiny tool in the sun knows the result! Shiny metas are about the only common objects that have this low emissivity. We can “trick” them into emitting TIR well by giving them a thin coat of something that emits TIR well. I coated one strip of aluminum with nail polish, and it stayed cool. Maybe backyard mechanics should buy some nail polish for their tools!

So, this is a long demo. You can make it into a series of real experimental tests if you think about it. Good luck.


pencil lead conducts electricity

PICTURES COMING SOON

Pencil “lead” does conduct electricity. You can show this with a simple LED, some wire, and a 9-volt battery. You can make it more quantitative with different “drawings” and even more so with an inexpensive electronic multimeter.

Pencil “lead” does conduct electricity

Equipment: an ordinary no. 2 pencil (other hardnesses work, too); a sheet of paper; one LED (light-emitting diode; almost any color or size; pennies); a 9-volt battery (even a run-down one may work; free, or maybe $3); wire leads(“leeds”) for the 9V battery (there are snap-on connectors, as shown ($0.50 but hard to purchase singly); you can also twist ordinary wires around the battery terminals and hold them on, say with tape.

Why pencil lead conducts electricity: Pencil lead is, of course, not metallic lead as was sometimes used to make marks centuries ago. It is graphite mixed with clay and fired to make it hard. Graphite is a form of carbon, as is charcoal (rather impure) and diamond. It conducts electricity, with some amazing special properties having been found recently, but those are long stories. Graphite is in the form of single sheets, one atom thick! Bulk graphite is made of perhaps thousands of sheets stacked together. The sheets easily slide apart, which makes graphite easy to write with as the sheets smear across the paper. Fortunately for this demo, the sheets overlap enough, even with that clay spreading around, so that they maintain connections of some of the sheets as far as you write. So, a nice, thick pencil mark acts as an electrical conductor, if a weak one… but good enough to carry a current to light an LED!

Setting up the demo: Wrap the lead from the positive terminal of the 9V battery to the longer lead of the LED. This is the lead that’s intended to carry a positive current into the LED to light it up. See the note at the end about positive and negative. Be sure you have the correct lead on the LED; applying 9V the wrong way might burn out the LED. Make the wrapping good and tight; expose more bar wire on the battery lead if you need to. You can strip off the insulation with a sharp knife held almost parallel to the wire – CAREFULLY. Strip the insulation off on two or three sides and then pull off the remainder. You’re now ready.

PICTUREs, with annotation

Lighting the LED: Place the LED down on the sheet of paper. Press down both the negative lead of the ED (the shorter lead, not wired) and the negative wire from the 9V battery. Put them any handy distance apart. DO NOT let the LED lead and the battery wire touch each other or you will instantly flow out your LED; it is not meant to carry huge currents that would result. Oops, did it? Just get another LED and start over. Now scribble with the pencil to bridge the gap between the LED lead and the 9V battery wire. The LED will start to glow! The heavier you make the pencil mark the more the LED will glow. Heavier marks make more conductive paths for the electricity. Of course, you can erase part or all or your pencil mark and see the effects.

Different pencil marks: Move to a clean section of the paper and try using smaller or larger distances between the LED lead and the battery lead. See how that affects the intensity of the glow. You’re learning about electrical resistance in “series,” just as you effectively learned about electrical resistance in “parallel” by making thicker or wider pencil marks the first time.

If you have some other equipment: You can measure the electrical resistance of the pencil mark or marks that you make with a multimeter (cheap – as low as $5, though fancier ones up to, say, $50, have many more functions, more sensitivity, and greater accuracy). Here’s a picture of one being used to make the measurement:

PICTURE

You can put the LED and battery off to the side and just examine the pencil marks with the multimeter. Set the function dial to ohms (with the symbol Ω, or word “ohms”). Press one lead of the multimeter to one end of the pencil mark and the other lead to the other end. Any modern multimeter will automatically choose the appropriate “range” of resistance. In the case shown, the reading is XXXkΩ. The “k” stands for “kilo,” or thousand. That’s a pretty high resistance but it does pass enough current. The resistance is high because most of the contacts between pieces of graphite have been interrupted by smudges of clay. You can figure out how much electrical current flows through that resistance. The LED “drops” 2 to 3 volts of electrical potential, depending on its color. The rest of the 9V drops across your pencil mark (the drop across wires is negligible). So, if you picked a red LED and a battery that has an actual 9V, then there’s 7V or so to pass across the pencil mark. The current is then those 7V divided by the resistance. That’s 7V/50,000 Ω or about 0.00014 amperes; amperes are the measure of current. We can express the current also as 0.14 thousandths of an ampere, or 0.14 milliamperes (mA). A typical LED at maximal current flow might pass 20 mA, or, for a bigger one, 50 mA… and there are huge LEDs, too, that pass more than a full ampere. Even at small current flows that you got with the pencil marks you can see enough light from the LED.

About positive and negative things in electricity. There’s an unfortunate terminology in electricity. In most electrical conductors, it’s the electrons that move. They have a negative charge. However, by convention, the flow of electricity or current is called positive when it moves in the direction opposite to the flow of electrons. Think of it this way: negative things moving to the left achieve the same transfer of electrical charge as positive things moving to the right. This way of thinking becomes automatic as you work in electricity and electronics. You usually don’t even worry if it’s electrons or ions moving.


Newton’s cradle: momentum running around

PICTURES COMING SOON

What does Isaac Newton teach us with an intriguing “toy,” Newton’s cradle. The quantity of motion, or momentum, is conserved. When steel balls collide, there are many possible patterns of which ones go and how fast. It’s addictive to try many patterns.

Newton’s cradle: momentum running around

Equipment: a Newton’s cradle ($18)

Newton’s cradle is a set of 5 steel balls hanging by light monofilament line. At rest, all 5 balls lie in a straight line, touching each other. One can then take any number of balls away to the side and release them, in order to watch the responses of all the balls, both those released and those initially at rest, They collide, move apart, collide again and again, while energy losses slow them (we’ll talk about where those losses are, later).

Newton’s cradle

Static

Videos for frame grabs – 1L; 2L; 3L; 1L+1R; 1L + 2R; 1+2L to stick to 3

The object lesson is learning the conservation of momentum, as well as the conservation of energy. Moving objects carry momentum; that’s the quantity of motion and it equals the mass of the object multiplied by its velocity. Yes, velocity has direction, not only magnitude or size, and so does momentum, but we know we’re only talking about motion in one direction, so let’s just call it speed. With mass m and speed v, the momentum is calculated simply as mv, that is, m multiplied by v.

The object also carries energy of motion, called kinetic energy. You need a bit more physics, but let’s just use the result that kinetic energy, KE, equals ½ the mass multiplied by the square of the speed, or ½ mv2.

When “elastic” objects such as steel ball bearings collide in the Newton’s cradle, momentum and energy both go into other balls. This tells us what the pattern of motion is after the collision.

Consider lifting the leftmost two balls up and to the left, then releasing them. They hit the three stationary balls. Then, the ball in the middle stays put and the two rightmost balls fly off to the right, a mirror image of the starting case. Those two balls are then moving at the same speed as the leftmost balls had when they contacted the other balls. It’s easy to prove mathematically that the only state of motion that conserves momentum and that also conserves kinetic energy is this fling to the right by two balls. You won’t get all three originally stationary balls moving off at various speeds; only two balls move. (The exact solution in physics gives a slightly different result, but minimally different when we take account of the tiny starting separations of the balls and the elastic deformations of the balls; yes, the steel balls deform a tiny bit as they collide! And, yes, steel is elastic, meaning that it deforms under a force and then regains its form almost exactly as the force is released. It’s a bit more complex that that, but steel and other elastic items don’t lose much energy in being hit and deformed.)

PICTURES – see list at top

Everyone likes to try different combinations – release only one ball from the left (only one ball leaves on the right); release three balls from the left (three balls leave on the right); release balls from opposite sides, one from the left and one from the right, both at the same speed (they both simply bounce back); release one ball from the left at twice the speed of a ball released from the right (check this out yourself). You can also make balls act as single units. Put a bit of modeling clay between two balls at the left and release them as a single unit. (Two balls shoot off to the right, the same as if the balls were not stuck together.) Try releasing those two balls at the same time as releasing a ball from the right at the same speed…. and then at twice the speed. Try putting clay on the side of the two balls that will hit the three stationary balls. What happens? You can see the results. If you want to get into the math, you can analyze all these cases. You could go to the exact solution, but that’s pretty heavy-duty math.

The exchange of momentum is very clear. The exchange of energy is a deeper story. In fact, we have to consider a second kind of energy called potential energy. In moving balls to the left or to the right while holding them “tight” on their supporting strings, we have to lift them up a bit against the force of gravity. That is storing potential energy. As the balls move, the potential energy is continuously converted into kinetic energy; gravity pulls on the balls to increase their movement, or accelerate them. The pattern in time of how potential energy changes into kinetic energy is an advanced topic that you’ll find in physics courses; the math is fun.

The motion of the balls slows down over time. Clearly, energy has been lost, both as kinetic energy and as potential energy. Where did it go? It got converted into two other forms. One is kinetic energy of air molecules pushed around as the balls move – they’re creating a little wind that carries energy farther and farther away. A second one is heat in the balls. Steel is not perfectly elastic. At each collision, some of the obvious or macroscopic motion gets changed into rapid internal motions among all of its atoms -sound waves run around in the ball and then slowly degrade into random motions called heat. You would find it vey hard to measure the rise in temperature of the balls after collisions. It’s very tiny, but real.

The challenge with the Newton’s cradle is that everyone wants to try their own releases. Leave more time for this than for most demos! It can be a good learning experience for students to sketch the resuls of all the different trials.


Make your own electric motor

Make your own small electric motor with a loop of wire, a magnet, a AA dry cell, and a few odds and ends. It works the same way as large motors, though don’t count on powering a Tesla this way.

Make an electric motor with a simple magnet and a loop of wire getting current through it from a common household “battery” (really called a cell, a dry cell): The essence of an electric motor is having magnetic fields repeatedly attract and repel each other.  In this simple motor there is a fixed, strong, rare-earth magnet at the base, and a magnet field produced in a rotating part or rotor by the flow of a direct current. That current makes the rotor into a modest electromagnet.

The rotor is a coil of wire with two free ends that have been stripped to bare metal (use a knife or side-cutters carefully) so that the ends make electrical contact in a manner seen below.  Key thing: Lay the coil flat and insulate one side of the bare wire by rubbing a good marker on it. This makes sure that the current gets interrupted on part of the cycle and keeps the rotor going in one direction.

Use a simple AA dry cell as the current source.  Take two bare-metal paper clips (that it, not plastic-coated) and straighten out a length on each to make a vertical support for the rotor, as below.  Affix the paper clips to the battery, one on each end, so that they stand vertically. Stiff duct tape should work. Brace the AA cell against rolling, such as with lumps of clay:

Now put a strong rare-earth magnet on top of the AA cell.  Slide the rotor into position between the paper clip ends, and bend one or both ends to keep the rotor from slipping out. The rotor should start spinning vigorously, perhaps needing an initial spin by hand!

Hints: Make the rotor with wire that’s stiff but not too heavy.  Use only solid wire, not stranded wire, which goes limp.

How it works: As the rotor rotates over the magnet, it is at times attracted to the magnet and at times repelled.  The diagram below shows eight phases of a complete rotation as we look down the axis of the rotor. At point A there’s a repulsion of the rotor as an electromagnet but no torque or twisting action. The rotor will keep moving, however, if it has been rotating; it has momentum (angular momentum).  At point B the rotor and the fixed magnet repel each other, forcing the rotor to rotate faster.  At point C the effect is neutral but the rotor has angular momentum to keep rotating.  At point D the fixed magnet “sees” the opposite pole of the rotor and attracts it, helping to pull the rotor around further.  At later points F, G, H we want the current off so that the rotor is not pulled the opposite way to bring it ultimately to a standstill.   To do this we have put the insulating marker coating on one side (say, up to one half) of the circumference of the bare wire end.

Here’s how the motor is assembled. The images below are numbered; the numbers and the text only show when you click an image to see it full size (a quirk of WordPress)

You can go further with this demo, making it more of an experiment.  You can find the magnetic polarity (north and south directionality) of both the fixed magnet and the rotor.  Use a simple compass to see which end of the compass needle moves toward the rotor (energized but held from rotating) or the fixed magnet. The rotor’s polarity depends on the direction of the current (you can swap it end for end to change the direction of rotation).  Its polarity also depends on which way you wrapped the rotor, clockwise of counterclockwise as viewed from the end; you can even predict the polarity from the “right-hand rule” relating current and the magnetic field (look this up). The direction should depend on the polarity of the fixed magnet, too; flip it over and watch again.

The Magdeburg sphere

PICTURES COMING SOON

Explore how really big air pressure is with a device first made 368 years ago – the Magdeburg sphere. An inexpensive “toy” can defeat some very strong people trying to pull it apart after someone sucks out some air.

Explore how really big air pressure is: evacuate a Magdeburg sphere:

Equipment: “toy” Magdeburg sphere. You can buy one in cast iron for about $25.

Note: You can do this without a vacuum pump; with a pump you can make the effect stronger.

This goes back to a dramatic demonstration 368 years ago in the town of Magdeburg, Germany. The town mayor, Otto von Guericke, had invented an effective air pump. He used it to pump the air out of a sphere made of two halves joined with an air-tight gasket. He then showed that the pressure of normal air outside was so great that two teams of 15 horses each pulling on the two halves could not separate the sphere! The sphere was ½ meter in diameter, so the area of each half-sphere was about 0.2 square meters. If all the air had been pumped out, the force on each half would be 20,000 newtons, that of a 2,000 kilogram mass in Earth’s gravity. Multiply by two for the two halves. You get the same force as exerted by a 4,000 kilogram mass, about 8,800 pounds!

You can do this on a small scale with the “toy” Magdeburg sphere. Here’s a picture:

PICTURES from above

Clean the rims of both halves well and then apply some thick grease, ideally vacuum grease such as you get with the vacuum pump. Join the halves and now suck out the air. First trial: do this by mouth (take care re hygiene; only one person does this, or you wipe down the tube with alcohol each time). Open the valve, put the exit tube in your mouth, and suck the air out. Using “cheek power” you can readily pull a vacuum that’s about 1/3 of normal air pressure. Close the valve. On a sphere of 8 cm internal diameter, you have an area of both halves that’s about 100 square cm or 0.01 square meter. The force on the halves at 1/3 of air pressure difference between outside and inside is then about 0.33*100,000*0.01 newtons or 330 newtons. That’s the force exerted by a 33 kg weight, or about 70 pounds. Get two people to try to pull the sphere apart; there are handles. Some strong, older students might be able to exert enough force to do this. They’ll fall in opposite directions suddenly; do this on a safe, soft surface such as a lawn, or pea gravel as we have at our school. Now boost the demo: connect the exit tube to the vacuum tubing on the vacuum pump and pump the air out. Now the effective force is 3x greater, that of a 100 kg weight. No two people can pull the sphere apart while standing, or maybe even foot-to-foot lying down!

YouTube link


Squeeze and sink

PICTURES COMING SOON

Control a tiny “submarine” with a hard squeeze… and learn the principle of how anything floats, from an ice cube to a ship. All you need is a handy plastic bottle, a test tube, some water, and a ruler.

Cartesian diver – squeeze a bottle and make it sink:

Equipment: minimal, cheap.

The Cartesian diver is a small item such as a test tube with an air space that just barely floats because it has an air bubble giving it buoyancy; it sinks when the air pressure on it increases to compress the bubble. To create the higher pressure, the diver is contained in a sealed vessel such as a plastic drink bottle. Squeezing the bottle (with its cap on!) creates the extra pressure. The Cartesian diver illustrates the principle of hydrostatics, that the upward force on an immersed object is equal to the weight of water (I presume you’ll use water) that the object displaces. With the right-sized air bubble, the object and its contained air bubble displaces a greater weight of water than its own weight. Squeezing the bottle compresses the air bubble and allow water to enter. Now the diver is not displacing as much weight of water as its own weight; it sinks. Relieving the pressure lets the diver rise. The cycle can be repeated endlessly. The hydrostatic principle applies to SCUBA divers, submarines, fish with swim bladders, and more. A note: I do mean weight, which is mass multiplied by the acceleration of gravity. People often confuse weight and mass, and, here, it’s actual weight.

Here are two images of the diver, afloat and sunk:

PICTURES

My combined sketch

Photo, filled bottle

Photo, dropping in the test tube

Photo, test tube floating

Photo? Measuring the float height

Photo, filling in the test tube

Video, quickly slipping in the partly filled test tube, then seeing it barely float, then squeezing it to make it sink, then letting up P to have it float again

Needed:

* A squeezable plastic bottle with its cap available.

* A “diver” – here, I use a simple glass test tube. You can use any clear item that will float with the air bubble up (not overturning). Be sure the test tube is glass and not plastic. Plastic won’t ever sink. Use a thin-walled glass test tube; a heavy one might not float, even empty.

* Water to fill the plastic bottle and to fill part of the volume of the diver.

* A short ruler

* A place to do this, away from computers and anything else that can be damaged by water

Fill the bottle with water nearly to the top. Do this over a basin because you’re going to spill some water.

  • Fill the bottle all the way to the top. Holding the test tube upside down, slip it into the bottle. It will bob up so that about half of it will be above the water line. We’ll get to why it reaches that level, later.
  • Now measure the height from the top of the water to the top of the tube. You’re going to want to take the test tube out of the water and fill it with almost the same volume of water as there was empty (air) space bobbing up; that will cancel the extra displacement of water that keeps the tube floating. So, suppose you had a 10 cm (4”) test tube and it floated with 4 cm above the water.
  • Take the test tube out and, holding it upright with the opening at the top, fill it with a little less water, say, 3.6 cm or 90% of the empty space. You can measure out the water slowly or be a little cavalier and then shake the tube sideways as needed to reduce any overfilling.
  • Now insert the test tube, again upside down, into the bottle. You want to keep all the water in the test tube, so do this quickly. Hold the water bottle at an angle just short of spilling out its water. Hold the test tube also at an angle, facing the water bottle. Swiftly push the test tube into the bottle.
  • If you didn’t spill any significant amount of water, the test tube, your diver, should just barely float. Now cap the bottle, tightly. When you squeeze the bottle tightly enough, the diver will sink to the bottom. Release the pressure and the diver will rise. You can do this indefinitely.
  • If the diver floats too high, it won’t sink with the highest pressure squeeze you can make. Take the diver out (easy: squeeze the bottle to bring the diver just above the rim of the bottle). If the diver sinks, retrieve it and fill it with less water. The easiest or least messy way is to hold the bottle upside down over a basin. Let your thumb off the bottle opening and grab the divers as it begins to come out. Refill the water bottle again.

A little more detail: Why use a glass test tube: Glass is denser than water; about 2.5 times more. By itself, it will sink. You have to give it a bit of air with water in its interior to make its filled weight match the weight of water it displaces. Plastic, on the other hand, is less dense than water and you can never get it to sink.

Making it a more quantitative demo: Calculate the level of air you need in the diver. You need to get the “weight” (mass) of the test tube, either using a small electronic scale or using geometry and the density of glass. Contact me if you’d like to see the sample calculations using the test tube dimensions.


A magnet fighting its own fall

PICTURES ARE COMING SOON

A magnet that fights its own fall? In a copper tube that conducts electricity so well, a magnet can do this.

The slow magnet: Dropping a rare-earth magnet in a copper tube: buy or borrow a pure copper tube with 3/4″ inside diameter and about 18″ long (hardware stores, alas, don’t yet do metric!). Also get a strong rare-earth magnet about 1/2″ in diameter.

It’s important to have it as long as or longer than its diameter so that it won’t tumble going down.  Stack a bunch of button magnets, if need be.  Hold the Cu tube over a soft pad (so that the magnets don’t crack hitting the desk or floor). Drop a nonmagnetic piece of similar shape down the tube; it comes out fast (about  0.3 sec.). Drop the magnet down the tube, especially while a student watches from above.  Better yet, let the student do it. The magnet takes several seconds to fall.  As it moves down the tube, its magnetic field “cuts” the copper tube to create an electrical current circulating around the circumference.  That creates it own magnetic field that opposes that of the magnet, slowing down its fall. You might ask if the fall could be stopped completely (with an answer that should be obvious) or several other questions.

PICTURE, VIDEO