colored flames

PICTURES COMING SOON

Flames in many colors: Just add the right chemical element and you can get red, orange, yellow, green, blue, or violet. Some of these elements occur in common household chemicals. A propane or butane torch, an old spray bottle, and some safety precautions and you’re good to go. There’s interesting quantum physics behind it all, too.

Many-colored flames

Equipment: a butane or propane torch ($15; be sure only a responsible adult handles it!); a selection of chemical compounds (some cheap, others pricey; I’ll note the safety issues, which can be handled readily).

This demo can be done as a short “Gee, whiz” demo, rapidly showing the flame colors. It’s far more interesting with all the context I develop here; I offer a lot of it here for fun and education.

We’ve all seen flames with different colors – the blue and yellow of a candle flame, some pure blue from a natural gas flame, deep red in a charcoal fire. Some of us have seen exceptional flames, such as burning magnesium (blindingly white, literally – never keep looking at it).

Getting new colors: We can look at what causes different flame colors. More than that, we can get many different colors in a flame by adding simple chemicals in small amounts. Take ordinary table salt, sodium chloride. Dissolve salt in some water. Put it in a small spray bottle (say, from eyeglass cleaner or nasal spray, cleaned out and dried). Set up the butane torch. Safety:

* Have an adult do this

* Be sure that the torch is very stable, on a table or desk; a torch knocked over can be a serious hazard.

* Have a fire extinguisher handy.

Get the butane torch burning nice and light blue. Spray the solution steadily into the flame about halfway along its length. You’ll get a vivid yellow! Why? To answer this we’ll talk about how electrons are running around in atoms (and molecules) and how changes in their states relate to energy, thus, to the color of light.

We’ll talk a bit more about safety of the chemicals at the end. First, please note that no one should inhale the spray! Toxicities are low but non-zero. There should be no problem with the small amounts sprayed into the flame and reaching the air in the room.

PICTURES

Why the colors appear: In chemistry or physics you learn that the atom has a tiny, very dense nucleus with a positive charge and a set of electrons of negative charge moving around them. The actual motion is complex and even beautiful while often simplified as the electrons moving in circular or elliptical orbits. The real patterns still retain the interpretation that electrons in an atom “at rest” occur at distinct or discrete energy levels. Let’s build up a sodium atom from a bare nucleus. We’ll need to eventually add in 11 electrons to match the 11 positive charges in the nucleus; sodium is thus chemical element number 11. The first electron ends up in an “orbit” or state called the 1s. One more electron can fit in this state, to give a atomic state we denote as 1s2, where the superscript “2” is counting those electrons. The next two electrons go into the state called 2s. Six more can go into three similar states all lumped as 2p. The eleventh and final electron goes into the 3s state. This is the state of lowest energy of the sodium atom in isolation… and that’s a common state for sodium that’s been wafted into the flame after the chloride partner gives back one electron to what started as a sodium atom missing one electron, an ion.

The flame is a state of high energy as disordered thermal energy or heat. Atoms and molecules in the flame bounce into each other with extreme frequency. Sometimes an electron on the sodium atom gets bumped up in energy from the 3s state to the 3p state. That’s not a stable state for various reasons. The electron can fall back to the 3s level. In doing that it loses a lot of energy. Ah, but energy is conserved! The energy is taken up in creating a particle of light, a photon. This photon, when it hits our eyes, gives us the sensation of yellow. There is an exact mathematical relation between the energy of the photon and its wavelength and, therefore, its color. (Light is a vibration of electrical and magnetic fields in space, as realized by the brilliant James Clerk Maxwell in 1860, and the idea carries into modern “quantum” physics, with interesting ties to the Nobel Prize for Albert Einstein! Light has a wavelength for its vibration, just as does sound or water ripples. There are lots of stories here.)

Let’s get some other colors: There are many metals that we can dissolve as salts and put into a flame. Each has its own electronic energy levels in both “ground” and “excited” states, and this gives their electronic transitions a special color. There may be several colors, with several transitions happening to

different atoms at the same time. To get nice, rather pure colors, we want the metal atoms to be combined with other atoms that don’t give another color to confuse the result. Many metals can be dissolved in, say hydrochloric acid to give chloride salts. Chlorine atoms don’t give light that we can see.

Let’s look at different metals, the colors they give, and the chemical compounds we can obtain and dissolve in water nicely. After this we’ll get back to the blues, yellows, oranges, and reds of common flames.

Element name Symbol Flame color Compound to use
Copper Cu Green Copper chloride or sulfate
Potassium K Violet Potassium chloride
Rubidium Rb Violet Rubidium chloride
Cesium Cs Blue Cesium chloride
Calcium Ca Orange/red Calcium chloride
Manganese Mn Lime green Manganese dioxide (see below) or nitrate
Lithium Li Deep red Lithium chloride
Iron Fe Orange Ferrous sulfate (ferric is insoluble)
Indium In Blue Indium chloride
Zinc Zn Aquamarine Zinc chloride or sulfate
Strontium Sr Red Strontium chloride or sulfate
Boron B Green Boric acid (borax is not as good)

The last element, boron, is not a metal, but it’s handy and it’s colorful, and the same ideas about electrons changing state apply. The particular salts to use, chloride or sulfates, are not critical; you might find some others, but avoid salts where the other part, the anion, imparts its own color that might mask the color you want. Obviously, avoid borates of the metals, or you’ll mostly see the green of boron.

Dissolve as much of a compound as possible. You’ll be using just a tiny amount sprayed into the flame, so you won’t waste much – and you can keep the solution and its solids for later, anyway. Some of these compounds are much more soluble than others. E.g., only about 6 grams of boric acid dissolve in 100 g of water, while 129 g of manganese nitrate will dissolve in 100 g of water! In any case, all the above are usefully soluble.

Getting these chemicals and using them safely: Some of these are easy to get and cheap, others are more specialized. Start with the easy ones:

* Copper: copper sulfate is sold as a root killer in garden or hardware stores (it kills roots that invade your oudoor plumbing. Cheap. Copper sulfate is toxic in fairly small amounts, even 1 gram. Don’t let anyone taste the pretty blue crystals!

* Sodium: this is ordinary table salt. Super cheap.

* Potassium: pharmacies and supermarkets sell potassium chloride as a “salt” substitute for people with high blood pressure. Make sure it has no sodium chloride at all, or the sodium color will dominate. Cheap.

* Calcium: Calcium chloride is sold in big bags to melt ice in cold climates. It is also sold in small amount, rather pure, for making some cheeses and can be bought online.

* Manganese is in alkaline batteries. You can cut an old battery open (careful with the sharp edges!). However, the manganese is as the insoluble dioxide. To make a soluble form, you can dissolve a pinch of the dioxide in a pinch of hydrochloric acid, HCl, also sold in hardware stores as muriatic acid (from the Latin muria, brine, since the chlorine is made ultimately from sea salt). BE CAREFUL; HCl is volatile, so that HCl gas wafts off the liquid. Its suffocating odor is a deterrent; its effect on lungs is terrible. Don’t breathe over it, and discard any leftover acid (in small amounts) by diluting it with lots of water.

If you can get ahold of manganese nitrate, you’re set, without any processing.

* Iron: You can get essentially pure ferrous sulfate as “iron pills” at a pharmacy or supermarket. They’re sold to treat iron deficiency in humans. Note: While iron is a critical element in our nutrition (usually obtained from food), an excess is toxic and even deadly, as it drives the destruction of organs. The most common accidental poisoning of children is from their naïve consumption of iron pills. Take care.

* Boron: boric acid is sold as a roach and ant killer. Get the pure stuff, not mixed with other chemicals. It is toxic to humans, too, at the level of a few grams. Don’t let anyone taste it!

The other chemicals are less available. Get your friendly local university chemist to give you a few grams, or have him or her do those demonstrations. You might also get them from a chemical supply house or Carolina Biological Supply.

Controlling the torch flame:

Why was the butane flame blue and orange to start with? Combustion of a hydrocarbon such as butane is a very complicated set of chemical reactions, all going on at the same time in a very short time as the butane and its products shoot out. The combustion is always a little bit incomplete, creating chemicals that have their own glow or luminosity. Very incomplete combustion, similar to that in a candle flame with its low temperature, creates balls of mostly carbon, called soot. When in a flame, they glow from what’s called blackbody radiation (the name has a long and fascinating history, even involved with Nobel Prizes). This is radiation of all wavelengths or colors. Its intensity rises with temperature. Its color changes with temperature, from red at low temperatures on up to blue at temperatures of stars, far higher than in any flame. To prevent the orange glow from masking the colors of the metals that you want to see, adjust the torch flame so it burns blue.

Finally, why is there blue in the torch flame? This color comes from some unusual and unstable chemicals forming in the flame. One such chemical is the radical CH, one carbon and one hydrogen bonded together. It’s very unstable and gets burned up eventually, but not before it glowed. Another compound is C2, just two carbons bonded together. Same deal – it’s unstable and it disappears, but it did glow on its way out.
 

remotely relighting a candle

IMAGES COMING SOON

Relighting a candle, remotely, is simple to do, but the physics and the chemistry of it has some real details. Here’s the link for this simple but intriguing item.

Relighting a candle, remotely

Equipment: A candle; matches- that’s all… all in a room without air currents (no fans, drafts, etc.)

That it works is simple to show: Light the candle and get a reasonably good flame going, not a small one. You may need to let the candle melt a fair-sized pool around the wick and then pour out some of the wax (not on the rug or tablecloth!). You want a length of wick above the liquid wax to be a bit long, even a centimeter (a bit less than ½”). Snuff out the flame rapidly. I do this put closing my two fingers on it and quickly letting go; don’t encourage young children to do this, as they might get a small blister. You can use anything else that closes on the flame and opens again quickly, or even a very short puff of air, though it often defeats the effect. At least blow through a straw rather than starting a big movement of air with a breath. The wick will now emit a wisp of vaporized wax and the breakdown products of wax. Quickly have a lit match ready. Go some distance up this stream, which may even reach 4 to 6 cm (about 1-1/2 to 2-1/2 inches) in good cases. Move the match flame into the stream and the stream will catch fire. It burns back to the wick and relights it!

VIDEO and some frame grabs

How it works: Candle wax is a complex chemical mixture, mostly long chains of molecules made of just carbon and hydrogen called hydrocarbons. You can’t light wax just by getting a flame near it. You need to heat it until its molecules both vaporize and partly break down into small molecules. The candle flame is constantly doing that. The small molecules, especially when they are hot, readily catch fire. That’s what’s in the smoky stream. You can also see that a flame in a flammable mixture (the vapors and the air mixed in them) readily propagates from its hot end toward any further supply of the mixture – here, toward the wick (as well as upward, though that’s less obvious as you’re focused on the downward burn). The rate of spread of the flame is faster with higher temperature, though you can’t affect that very much in this setup.

Question to ponder: Why does the vapor trail from the extinguished wick stay together in a narrow stream? Why doesn’t it just spread out and become ineffective in letting the flame jump back to the wick? Let’s call the stream a self-organizing system. Its heat content generates a pattern of flow in the surrounding air that surrounds the vapor stream tightly and also helps move it up.

flash paper

MORE PICTURES COMING SOON

Paper that burns in a flash before it hits the ground: making flash paper with care: Take paper that’s really pure wood fiber (cellulose); react it with nitric acid to replace parts of the molecules; wash it and dry it. Put a match to it and it disappears in a rapid flash, leaving no ash. Make a flaming paper airplane! Dangerous chemicals, but it can be done safely. Here’s the link to the story.

Paper that burns in a flash before it hits the ground: making flash paper with care: Take paper that’s really pure wood fiber (cellulose); react it with nitric acid to replace parts of the molecules; wash it and dry it. Put a match to it and it disappears in a rapid flash, leaving no ash. Make a flaming paper airplane! Dangerous chemicals, but it can be done safely.

VIDEO, incl. new one

Equipment and supplies: High-quality paper without clay sizing to make it shiny – that is, white paper towels; scissors to cut the paper towels; a graduated cylinder (100 ml capacity; $12) is handy to measure out the acids; concentrated sulfuric acid ($20-44, from a chemical supply house or, say, Carolina Biological Supply); concentrated nitric acid (ditto); 3 shallow glass bowls, about 15 cm (6”) diameter (kitchen bowls are OK; they will not be harmed); pitcher of water; plastic tongs to handle the treated paper; a watch to time the treatment; an acid-resistant surface on which to carry out the treatment; protective equipment – see below.

Precautions: Only an adult with a good knowledge of chemistry should run this demo. both of the acids are dangerous, sulfuric especially so; it will cause severe burns to your skin, even charring it. It will corrode many surfaces. Treat sulfuric acid with extreme respect. It also reacts vigorously with water. If you add water to concentrated H2SO4, the water will get so hot that it flashes to steam, spattering acid all over. Never add water to sulfuric acid; only add acid to water, with care. Nitric acid by itself is not quite as corrosive but it will turn your skin yellow quickly. The vapors of nitrogen dioxide above the acid are very corrosive and damaging to your nose and lungs. Don’t breathe near the open bottle of nitric acid. The combined sulfuric and nitric acid creates the nitronium ion, some of which appears in vapor above the mixture. Never breathe near the reaction bowls, and be sure to have good air circulation. The mix of acids creates the nasty nitronium ion that appears above the bowl. Prepare for accidental spills; have baking soda, or, better, commercial neutralizing powder on hand. Wear full protection – gloves, goggles, and a lab coat. Have water on hand in good quantities to wash off any acids. All this said, with care the treatment can be done safely.

What we’re doing: We’re going to alter the cellulose molecules with nitro groups NO2, as internal sources of oxygen (and nitrogen) for really fast combustion – so fast that the flame spreads internally at high speed, maybe one second to burn up a square of flash paper 6 cm (2.5”) on a side. The details of the chemistry are added at the end of this write-up, for those of you who want to know.

Preparing the flash paper, which we can call cellulose nitrate or nitrocellulose. Sounds a bit like trinitrotoluene (TNT) with that “nitro” in there, doesn’t it? It should; it’s also a possible explosive, but don’t worry; that won’t happen in open air. The effect is still surprising.

* Get all your protective gear on, and the same for onlookers.

* Prepare the paper toweling: cut it into squares about 6 cm (2.5”) on a side. Keep them dry. Make anywhere from 3 or 4 to about 10 to 15.

* Set out 3 glass bowls and fill two with water.

* Have ready: the plastic tongs, a watch to time 2 or 3 minutes, and a bunch of paper towels that you’ll use to dry the treated papers.

* In one of the glass bowls, pour concentrated nitric acid into the graduated cylinder to about the 50 milliliters (ml) mark. The amount is not all that critical. Pour this into one of the glass bowls. This must be the first acid put in; it cannot be the sulfuric acid.

* Use the graduated cylinder to measure out about 50 ml of concentrated sulfuric acid. You could be very attentive and use a new graduated cylinder or else clean and fully dry the one graduated cylinder, but it won’t matter. Pour the acid into the bowl with the nitric acid – slowly, and letting the mix cool if need be so that it won’t boil.

* Here’s the repeated treatment:

* With tongs, slip a single square of paper towel into the acid mixture.

* Let it sit for 2 to 3 minutes, then use the tongs to take it out, letting the acid drip off as much as possible.

* Slip the treated paper into one of the bowls with water. Move it around for about 15 seconds.

* Move it to the second bowl and do the same. Now it should be pretty well rinsed of acid.

* Dry the paper square well between folds of a big square of paper towel.

* Remove it from the paper towel and let it air-dry.

* You can speed up the process with a hair dryer or a warm electric hot plate, but you may get a real surprise: it may flash into nothing before your eyes if you get it too hot, and “too hot” is still way below what sets ordinary paper to even charring.

The ignition: You can do this lots of ways. You can hold the flash paper with tongs or tweezers or whatever and light it at the far end of the square. The burning will be very fast. You can’t let it go from the tongs fast enough that it will hit the ground before it finishes burning. Like some magicians, I like to hold the flash paper by finger and thumb at a corner and then have someone with a match light the match and touch it to the far corner. I let it go as fast as I can and the paper finishes its yellow flash after it has dropped only a foot or so! Note that you can get a hot finger if you wait too long to let it go. However, the mass of burning matter is very small, so you are unlikely to get any notable burn. Be warned, however. I know how to do this, and you may find you need some practice after watching an expert. We’ve also folded the square into a tiny paper airplane. We’ve lit it from the front and thrown it forward as fast as possible. It makes a show that we’ve caught with a high-speed camera. The image is fuzzy, with very low spatial resolution. We made it with a Casio Exilim Z-10, alas, no longer made. It can do 1000 frames per second! Even 240 frames per second is good, if you get some SLR cameras or a Go-Pro.

VIDEOs again

The chemistry

Cellulose is a polymer of the ordinary sugar, glucose. That is, glucose molecules link up end-to-end with the elimination of a water molecule at each link, making a strong and stable molecule (so stable that only bacteria digest it; even cows need bacteria to do it for them). Cellulose can burn, as in a wood fire, but slowly. Lots of oxygen has to reach it from the air to carry out the full combustion reaction, and that’s rather slow compared to what we’re going to do. We can write the chemical formula for cellulose as (C6H10O5)n, where the ”n” means that it’s repeated “n” times; the number “n” is in the tens of thousands.

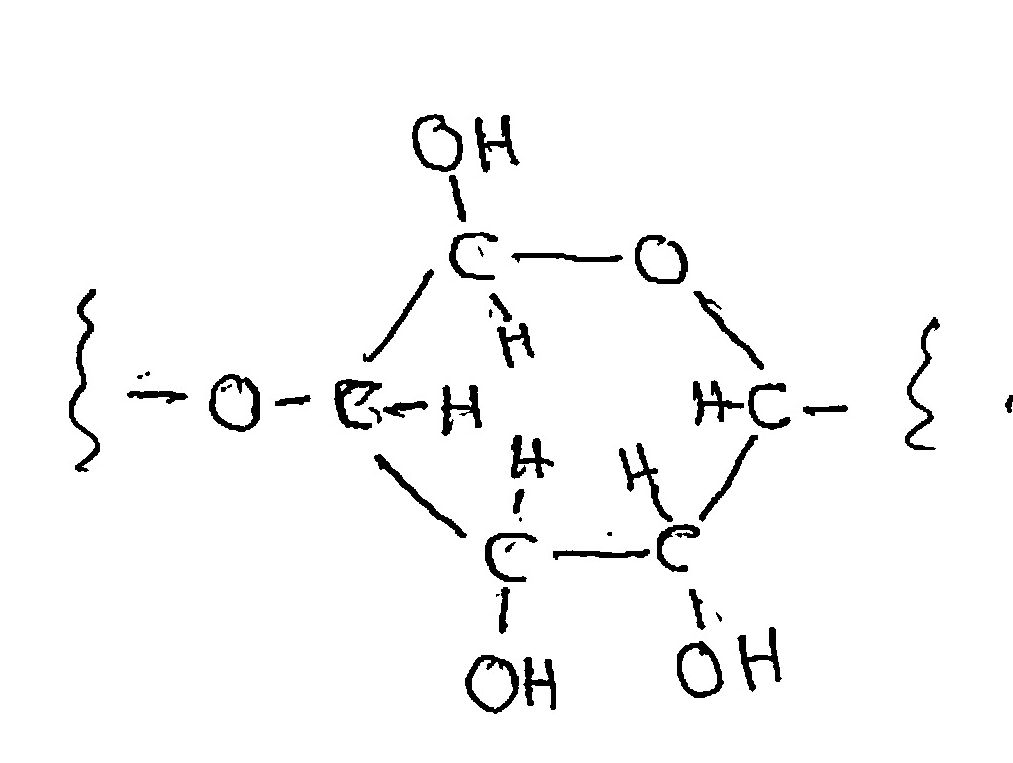
The “stick formula” for cellulose, which doesn’t show the real spatial orientations of the atoms but which shows who’s connected to whom is

The reaction for combustion in air we can write for each set of two subunits as

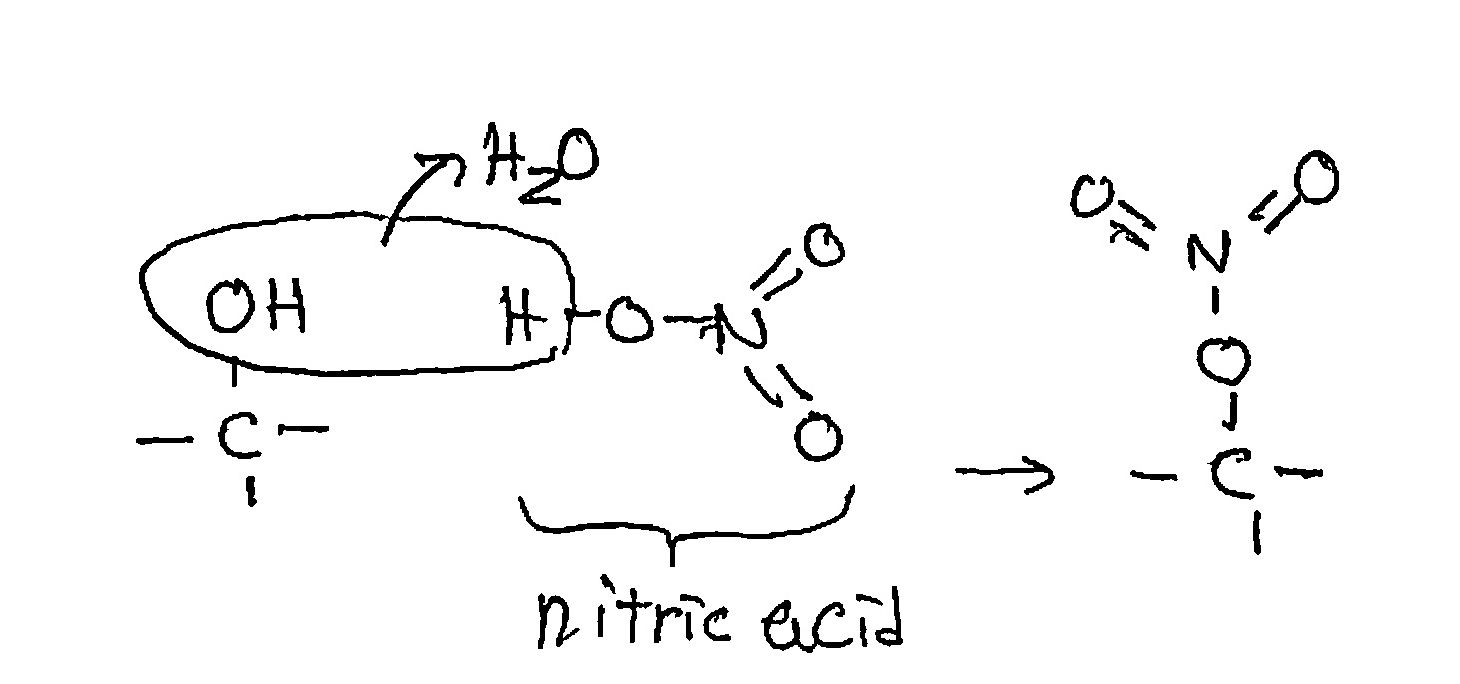
We’re replacing many or most of the hydroxyl (OH) groups sticking out, 3 per glucose, with nitro groups:

The reaction occurs at each OH group. Now we have a lot of oxygen in the molecule, plus some nitrogen, which also liberates a lot of energy in the final reaction.

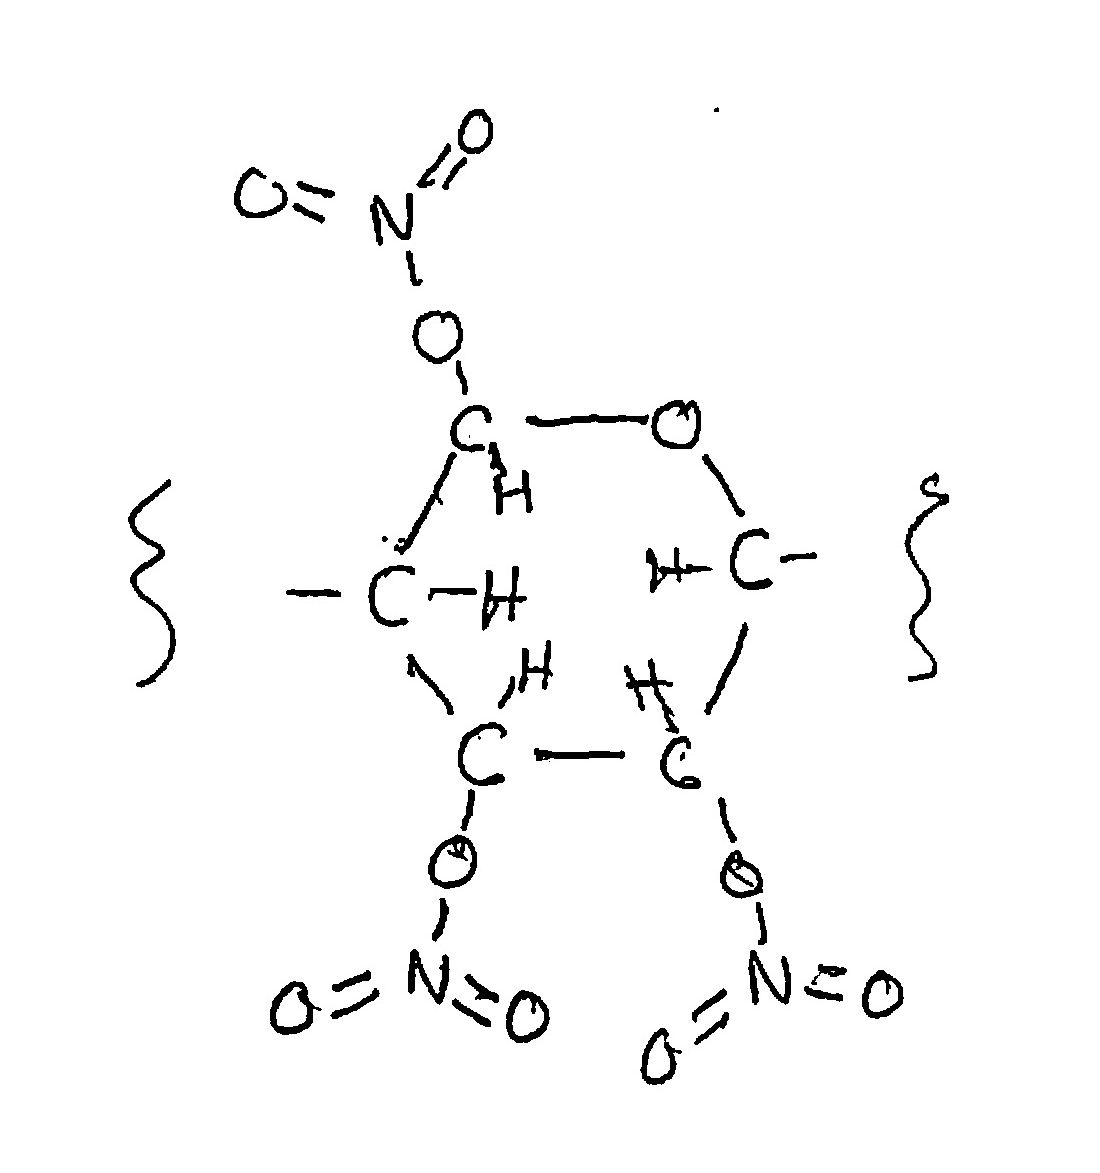
The final molecule looks like this

Hold on: the sulfuric acid doesn’t appear in the product. What is its role? Foremost, it strongly ties up the water molecules generated by the reaction of nitric acid. That prevents the water from accumulating and discouraging the continued liberation of more water. The very high acidity of sulfuric acid also activates the nitro group in nitric acid to chemically attack the hydroxyl groups of glucose.

Now the formula for its combustion can be written in two ways, though the reaction is some mixture of the two paths. If there’s lots of air with oxygen around, the carbons all burn to CO2 and the hydrogens all burn to water; that releases a lot of heat energy. The nitrogens combine with each other to make the strongly bonded N2 molecule, also releasing a lot of energy. We can write the reaction, per 4 units of glucose, as

If nitrocellulose (what we’ve made) combusts with no outside oxygen, there’s only partial oxidation of carbon to CO2, the rest ending as carbon monoxide, CO. That’s still a big energy-producer; the triple bond is the strongest bond in nature. The whole reaction looks something like

Reality is messier. We rarely get full conversion of the OH groups to nitro groups; the reaction of “self-combustion” will not go exactly to completion, possibly leaving minor chemical species, even H2. In any case, we get a fast reaction in air, and a real explosion in a closed container.

a candle on and off

PICTURES COMING SOON

Air, not air, and super-air: how does a candle burn in air, carbon dioxide, and pure oxygen? It’s easy to create these three different conditions and learn a bit of chemistry. If you have a vacuum chamber you can even fine tune the combustion.

Air that’s not air: extinguishing a candle, or …:

Equipment: a candle, and matches or a lighter to light it; a cup (optional) to put it into; another cup for mixing; baking soda; and vinegar. For an option you can also get some hydrogen peroxide and an old alkaline battery (cell).

How candles burn: Chemicals that allow burning of common fuels and chemicals that don’t: We light a candle and the flame on the wick heats up the wax around it, even making into vapors. Those vapors are composed of the elements carbon and hydrogen, both of which readily combine with oxygen when they are hot enough. (I put the chemical equation at the end, so as not to interrupt the narrative here.) Ordinary air has 21% oxygen when dry, 78% nitrogen, and 1% argon, a noble gas (very loath to react with any other chemical). Water vapor dilutes these a bit, up to about 6% in the most humid livable conditions for us humans. Candle wax, and most things we think of as combustible, don’t react with nitrogen in the air, but, hey, there’s enough oxygen for most fires that we want… and for our “controlled fires” in our bodies, our respiration that’s done with the help of many proteins in our cells. That’s another very detailed story that I won’t go into here.

Carbon dioxide is a gas that looks just like air, that is, transparent, invisible to the human eye, even if it’s extra-visible in the infrared that we can’t see. It’s present in ordinary air at generally low concentrations. Averaged around the globe it’s at about 415 parts per million in free air. In a closed room just our breathing may raise it to several percent; it had better not reach 10% or we can die from a few discrete effects on our bodies. Our breath is about 2% CO2. If we hold our breath we can get it to about 20% CO2, not a great idea to keep doing. CO2 does not support the burning of candle wax. In fact, it’s one of the final products of burning candle wax, the other part being water vapor.

The set-up: Basically, we can make pure CO2 readily by reacting common household chemicals, vinegar and baking soda. We can collect it in a cup and then pour it onto a candle. It can collect because it is denser that air and sits at the bottom of the cup. Its molecules weigh more (have a higher mass) than air molecules. So, light the candle. In a cup, say, a coffee cup, put some baking soda in it; use about ½ teaspoon; even ¼ tsp is enough if you’re careful. Slowly pour in about a tablespoon of vinegar. The mass will foam; don’t let it overflow. Let the bubbles pop. You might cover the cup with a piece of paper to avoid losing too much CO2 to air currents in the room. Now carefully hold the cup over the candle flame, safely high enough not to get burned or to burn your cup if it’s paper. Tilt the cup reasonably quickly to let the CO2 fall right onto the top of the candle flame. It will go out, because CO2 won’t support combustion.

PICTURES

Variations: First, put the candle into a cup that is, say, a few cm (an inch, plus) taller than the top of the wick. Instead of pouring the CO2 directly onto the wick, pour it into the cup that’s holding the candle. Do this slowly, so that the CO2 will rise as a layer. When the CO2 reaches the height of the wick the flame will go out. Of course, you won’t see the CO2 but you’ll see its effect when the candle flame goes out. Second, try adding more oxygen instead of replacing oxygen. There are several ways to do this, but BE CAREFUL. An easy one is to pour about 5 milliliters (a teaspoon) of common hydrogen peroxide solution into the mixing cup. Open a packet of dry yeast and sprinkle some into the hydrogen peroxide. The enzyme catalase in the yeast cells will cause a huge release of pure oxygen gas. Pour it onto the candle flame, very carefully – the flame will rise higher and hotter, so keep a decent distance above the flame. The rate of combustion increases with the concentration of oxygen, as this shows.

There’s a way to decrease the amount of oxygen available to the candle flame in any amount. We can put the candle into a vacuum chamber and slowly draw out the air. That demo is described in a bigger demo about using the vacuum chamber.

The chemical equations: For wax burning in the oxygen in the air: the chemical makeup of candle wax is closely CH2, in units all joined together into somewhat long chains. Let’s look at just one unit:

A couple of things: First, there’s that water on the side showing the results, or products of combustion. Second, note that I use what is called an improper fraction, in which the numerator is bigger than the denominator. That’s almost the universal practice in science. It’s so much easier and less prone to error than using two-part proper fractions such as 1-1/2, when you multiply or divide numbers. Third, the fraction is a fraction of “jillions” of molecules; there are no half molecules. The number of molecules in, say, 1 gram of wax (about 1/5 of a teaspoon) is greater than ten to the 21st power, the digit 1 followed by 20 zeroes. The number of oxygen molecules involved is much greater.

What’s happening with hydrogen peroxide? That’s H2O2 – water with an extra oxygen atom in each molecule. It’s prone to break up and give up that oxygen: