
MANY IMAGES TO COME SOON
Many ways to have fun and learn with a vacuum chamber: Explore air pressure inside and outside of objects, dramatically; explore what “boiling point” really means; find out how sound transport and combustion are determined by air pressure; prepare for a dramatic experiment on air drag in a vacuum.
Fun with a vacuum chamber – a series of demos suitable for 15-30 minutes:
Equipment: substantial investment ($440, but utility is lifelong and good for public demos)
Explore air pressure inside and outside of objects, dramatically; explore what “boiling point” really means; find out how sound transport and combustion are determined by air pressure; prepare for a dramatic experiment on air drag in a vacuum
The whole shebang – what you need:
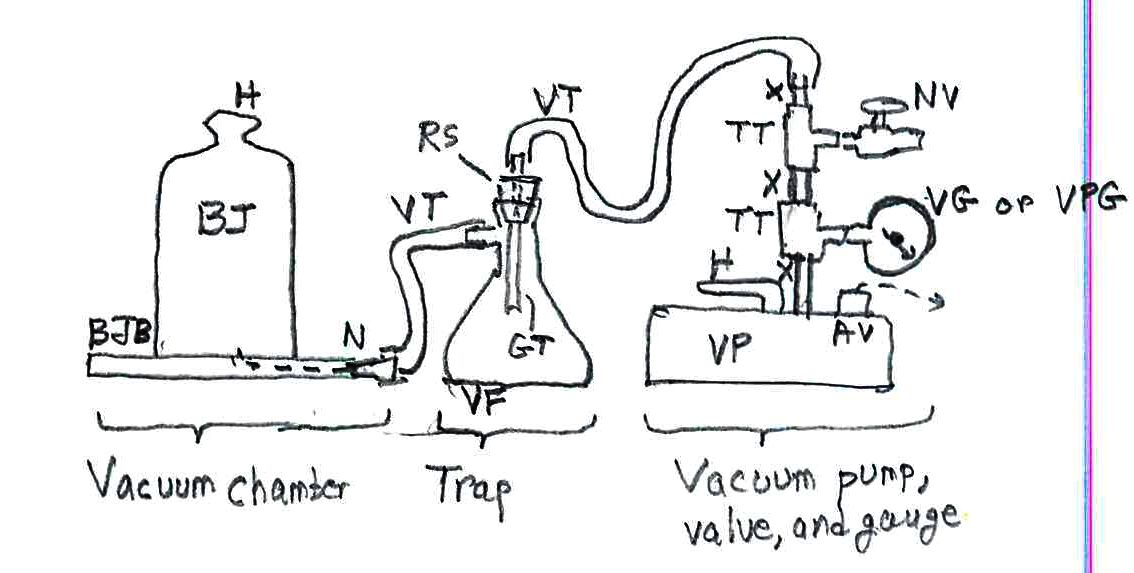
— the chamber for your experiments: a bell jar BJ with its gasket base BJB and a plastic nipple N for attaching the vacuum tubing to the base. The nipples cost only pennies; they come with the bell jar, but keep spares). The handle H and an arm around the bell jar is the safe way to pick up the bell jar. I paid $250 for the set, which is a big set for big demos and experiments. There are cheaper sets with small bell jars. The kit comes with vacuum grease to make a good seal between bell jar and base;
— heavy rubber vacuum tubing VT (about 2 m or 6’; maybe $5);
— the trap to prevent liquids and powders from getting into your vacuum pump and jamming it: a vacuum flask VF from a chemical supply shop ($10?); a rubber stopper RS to fit the flask (cheap; $0.50 as part of a kit); a short length of glass tubing GT to put through the stopper (pennies); a tool to pierce the stopper, esp. a cork borer of the diameter of the tubing ($2?); a simple triangular file to notch the glass tubing for breaking it by hand; gloves ($12) for this operation!; for safety, a butane torch to polish the glass tubing so that it’s not so sharp (buy this for other experiments, or find it in your home shop)
— the vacuum pump, its valve, and gauge: a vacuum pump VP ($105) with its handle H; note its built-in air vent AV that you need to open before a run and then close to keep dust out; the pump comes with special oil; a vacuum gauge VG or a combined vacuum/pressure gauge VPG to measure your vacuum extent ($20? I had such items from a long career and didn’t buy it anew for vacuum demos and experiments); 2 brass or steel threaded “tees” TT to attach the vacuum gauge and the bleed valve to the line ($6?); a needle valve NV to shut tight to pull a vacuum or to open to bleed air back into the chamber ($20?); short lengths of threaded nipples X (tubing with screw threads on both ends) ($8?).
Some safety considerations: A bell jar (your vacuum chamber) is a huge piece of glass; if you drop it and it shatters you have dangerous glass pieces running around. Note: it will not break under a vacuum; don’t worry about that. Another consideration: never put anything flammable inside a vacuum chamber – its vapors can explode upon reaching the vacuum pump with its electrical contacts in the motor. Just to protect your investment, don’t let liquids or powders get sucked out of the bell jar and into the vacuum pump; they can jam the mechanism for instant damage. To protect against this problem, use the indicated trap between the bell jar and the vacuum pump. Here’s the entire setup:
FIGURES or photos
Actual photo
Bell jar
Base, peeling up a ring; add arrow for “vacuum grease here”
Vent partial blocker
Bell jar on base with a balloon inside
Picture of vacuum gauge at zero
Balloon expanding, 2 stages
Vacuum gauge at peak
Magdeburg sphere split
Magdeburg sphere assembled
Sucking air out (or pull a frame from video
Pull a frame from students pulling on the sphere
Explore air pressure on the inside: super-expand a balloon: Blow up a nice round-ish balloon (not a long skinny one), one that blows up to about 1/3 the height of the bell jar. By pulling a vacuum on it, you can make it expand to fill the entire bell jar, covering all the walls… and popping eventually. You’ll need to prevent it from blocking the exit hole of the bell jar, which would stop the expansion. The easiest way to do this is to tape down a very short pencil or other round object so that it nearly covers the hole. It’s dramatic. The process here is just creating a difference in air pressure between the inside of the balloon and the outside. Balloons are normally inflated to an air pressure that’s a modest increase over the normal… and amazingly high… pressure in ambient air. At sea level it’s just over 100,000 pascals in metric (SI) units…which is a force of 10 metric tonnes on a square meter of area! There is a huge mass of air above your head. There’s a huge pressure of air inside your body, likewise. Scuba diving instruction makes you really aware of this. You can explode your lungs by letting up on outside pressure, as by ascending from even a modest depth while holding your breath. The first rule in scuba diving is not “have a buddy,” which is important, but instead it is “never hold your breath!” Changes of air pressure as a small fraction are induced by moving up in altitude; your ears likely “pop” ever few hundred feet (hundred meters) if you climb or go up in an unpressurized plane. Back to the balloon: it is ordinarily inflated to a pressure that might be 10% over ambient air pressure. The difference between 1.1 atmospheres of pressure inside and 1.0 atmospheres outside inflates the balloon. Putting the balloon in the vacuum makes a pressure difference 11 times greater, between 1.1 atmospheres inside and 0 atmospheres outside. That would be at the start. As the balloon expands in the vacuum, its internal pressure drops; there are interesting forays into the gas laws of physics to explore if you want to dig in.
More of exploring air pressure inside: expand a marshmallow: Marshmallows are full of closed air spaces; that is, air inside them can’t simply leak out. Put a marshmallow in the bell jar and pull a vacuum. It will expand like you’ve not seen it. Release the vacuum and retrieve the marshmallow. I fibbed a bit – some of the air spaces did break, so the marshmallow is a little smaller and a little less tantalizing to the tongue, but still tasty.
Explore what “boiling point” means: Let’s boil water, but at a temperature way below what we usually think of as its boiling point. Get a small insulated non-metal cup (non-metal, because you’re going to put it into a microwave oven. Put some pebbles or broken ceramic or commercial “boiling chips” into the cup, to help start bubbles forming during the demo. Add to the cup a small amount of water, say, ½ cup (around 120 ml in metric units) and warm it to about 50°C (122°F) in a microwave oven (careful! You can apply too much energy and superheat the water, such that it explodes into steam when you reach for the cup, spraying boiling water your way!). Use a short heating time. For a common 1000 watt oven, you’ll get a rise from room temperature of around 20°C to the desired 50°C in the ½ cup of water in about 15 seconds. To be safe, use 8 seconds and test the water temperature with your finger. That should bring the temperature up about 15°C, to near body temperature. If it feels right, add another 7 or 8 seconds. Put the cup into the bell jar and pump out the air. The water will start boiling when you get most of the air out!
Here’s the reason: all liquids evaporate to make vapor. That vapor has a pressure that’s a strongly increasing function of temperature. Here’s a graph of it:
When that pressure meets or exceeds the surrounding air pressure, the vapors come out as bubbles. The liquid is boiling. From the graph, you can read that boiling occurs at a pressure of 12400 pascals at 50°C , and that’s a pressure that’s only about 12% of normal air pressure. You’ve then pulled a vacuum that’s 88% of full air pressure. You’ll need to pull more of a vacuum as the water cools.
This is a demo, but you can make it into a full-fledged experiment by using different water temperatures and seeing what vacuum degree makes water boil. You could, in principle, do this with other liquids, but I can’t think of a safe liquid to use – nothing flammable is safe; common nonflammable liquids have really high boiling points.
Explorers and mountain climbers in the not-too-distant past used the relationship of boiling temperature to air pressure to determine how high they were above sea level. They knew the pattern of air pressure versus elevation as a simple mathematical function (math guys: the fraction of sea-level pressure at elevation h is exp(-h/8400m)). Boil a cup of water, take its temperature, use the formula for pressure versus elevation, and, voila, you know how high you are!
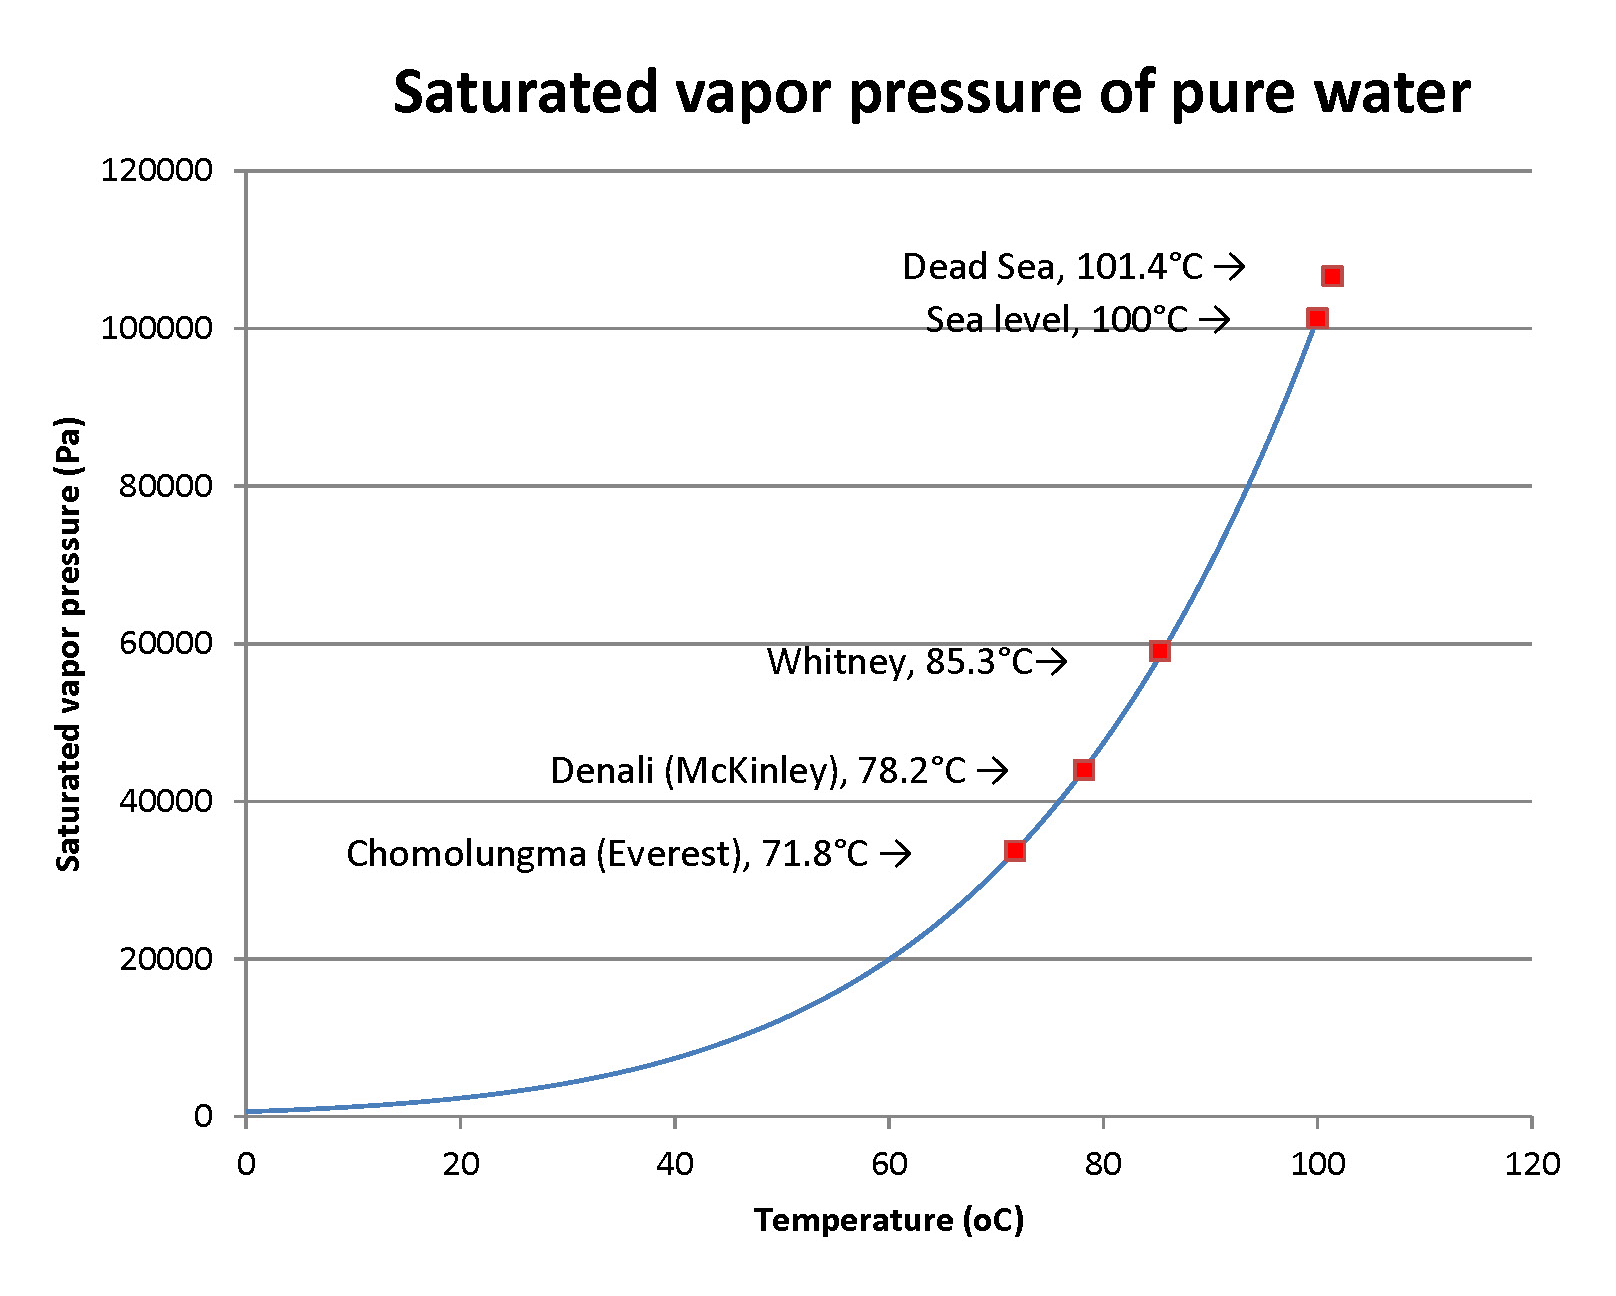
Chomolungma is the highest peak on Earth, at 8,846 meters (29,032 feet); water boils way below the “usual” temperature. Denali in Alaska is at 6,190 m or 20,310’; Whitney in California is at 4,494m or 14,505’; the Dead Sea is at -430m (minus 430 m, below sea level) or -1,411 feet… it can’t flow to the sea. Air pressure varies significantly with season, and especially on high mountains: cold seasons “condense” the air to lower elevations, leaving less air above and lower pressure on mountaintops. Air pressure on Chomolungma varies from 30,900 to 34,300 pascals, more variation than anywhere else on Earth.
Explore how really big air pressure is: evacuate a Magdeburg sphere:
Note: You can do this without a vacuum pump; with a pump you can make the effect stronger.
This goes back to a dramatic demonstration 368 years ago in the town of Magdeburg, Germany. The town mayor, Otto von Guericke, had invented an effective air pump. He used it to pump the air out of a sphere made of two halves joined with an air-tight gasket. He then showed that the pressure of normal air outside was so great that two teams of 15 horses each pulling on the two halves could not separate the sphere! The sphere was ½ meter in diameter, so the area of each half-sphere was about 0.2 square meters. If all the air had been pumped out, the force on each half would be 20,000 newtons, that of a 2,000 kilogram mass in Earth’s gravity. Multiply by two for the two halves. You get the same force as exerted by a 4,000 kilogram mass, about 8,800 pounds!
You can do this on a small scale with a “toy” Magdeburg sphere. You can buy one in cast iron for about $25. Here’s a picture:
PICTURES from above
Clean the rims of both halves well and then apply some thick grease, ideally vacuum grease such as you get with the vacuum pump. Join the halves and now suck out the air. First trial: do this by mouth (take care re hygiene; only one person does this, or you wipe down the tube with alcohol each time). Open the valve, put the exit tube in your mouth, and suck the air out. Using “cheek power” you can readily pull a vacuum that’s about 1/3 of normal air pressure. Close the valve. On a sphere of 8 cm internal diameter, you have an area of both halves that’s about 100 square cm or 0.01 square meter. The force on the halves at 1/3 of air pressure difference between outside and inside is then about 0.33*100,000*0.01 newtons or 330 newtons. That’s the force exerted by a 33 kg weight, or about 70 pounds. Get two people to try to pull the sphere apart; there are handles. Some strong, older students might be able to exert enough force to do this. They’ll fall in opposite directions suddenly; do this on a safe, soft surface such as a lawn, or pea gravel as we have at our school. Now boost the demo: connect the exit tube to the vacuum tubing on the vacuum pump and pump the air out. Now the effective force is 3x greater, that of a 100 kg weight. No two people can pull the sphere apart while standing, or maybe even foot-to-foot lying down!
Explore sound propagation at low air pressures: Get a mechanical noise-maker that will run for a minute or two on its own – a buzzer. Most electronic buzzers should work, also; they’re resistant to pieces bursting at low pressure. Put the buzzer in the vacuum chamber and pump it down. The sound will die down progressively. The reduction in sound transmission is a bit complicated to predict and it takes special equipment to measure the sound intensity outside, but the effect is clear. Sound is a vibration moving through the air… though it also moves through water and stiff solid nicely, and poorly through squishy items that “damp” it.
Explore chemical combustion in low air pressure: slowly extinguish a candle: A handy sample of combustion is a burning candle. Light the candle and put it inside the bell jar. Pump down the bell jar in stages, noting the flame height and light intensity at different air pressures. The fire needs oxygen as a complement to the wax that’s burning. The oxygen content of normal air is 21% of the total amount, whether measured as pressure, moles, or whatever. The key item for the candle is the partial pressure of oxygen, which is the total air pressure in the bell jar multiplied by 0.21 (21%). Lower oxygen pressure reduces the rate of combustion, and eventually combustion stops. This is a phenomenon well known to fire-prevention specialists.
To calculate the fraction of oxygen pressure relative to normal air, divide the pressure in the bell jar by normal air pressure. Now, you may have a gauge on your vacuum pump that reads only vacuum, which is the reduction of air pressure. Your gauge might read in any of several units. If you live in the US, the only nation not on the metric system, the gauge will likely read in pounds per square inch, or psi. Normal air pressure is 14.7 psi at sea level. So, if your gauge reads a vacuum of 5 psi, you’ve reduced air pressure to a fraction (14.7 – 5)/14.7 of normal, about 2/3. If your gauge reds directly in air pressure as a positive number it will be showing 14.7 – 5 = 9.7 psi. Look at the flame height vs. pressure in the bell jar. Find out at which air pressure the flame goes out.
Lead-in to a real experiment: figure out how you can show that a feather or a light tissue falls as fast a a dense solid object in a vacuum. The absence of air drag makes only gravity important. We did this in our school, and I’ll write this up under STEM experiments. It took some finagling to find how to hold a tissue and a button at the top of the vacuum chamber with a magnet and a small magnetic latch inside the bell jar. See if you can design a setup.